With all the different social networks and platforms, its easy to find yourself overwhelmed or spending countless hours per week making sure you've got current posts and content spreading to all the appropriate networks.
This is why I looked into an auto scheduler.
I decided to do a little comparative study between several services I found on google. You can click here for where I got my initial list.
Simply by reading that list, you can weed out a substantial amount of options based on what your needs are.
The first service recommended to me was Grum...which is not on that list.
My relationship with Grum was short lived. Every social network I have for business is connected. As any efficient business owner would have it.
Grum simply did not provide the convenience to post to multiple platforms like I was desiring. Nor did it allow the capability to edit photos or throw on filters.
I'm in the eyelash and skincare industry. I NEED FILTERS. IG filters specifically...they're amazing.
I will say that I read that Grum allows you to give access to your VA (virtual assistant) without divulging any login information. This may prove a useful tool for some.
I decided to try Viraltag and Hootsuite simultaneously.
Right off the bat I was leaning towards Viraltag. That's the power of a good website. They sold themselves well.
However, their introductory offer was a 14-day free trial vs Hootsuites 30-day free trial. 30 days is obviously better.
Hootsuite requires CC information upon signing up for their trial. Viraltag does not. I preferred Viraltag in this regard.
Comparatively, they both manage a multitude of platforms, each offering a different price point for required functionality.
Price wise - Hootsuite takes the cake here.
Not only do they offer a FREE option altogether, the price point is lower than Viraltag if you decide to upgrade.
However, Viraltag is a relatively new company., and you know what newbs love to excel at?
Customer service.
Viraltag offers you the option to write an honest review after the initial 14-day trial and in exchange, you get 6 months FREE OF CHARGE.
WIN!
After the 6 months you are offered an exceptionally discounted rate. Compared to Hootsuite here...if you had decided to upgrade...Viraltag comes in FTW!
So that's what is happening here. I am writing an honest review of my experiences with both services. Click here to check them out.
Viraltag vs Hootsuite
Platform options. While they both do offer at least 4 platforms to upload to, Hootsuite does not include Pinterest.
Viraltag - 1 Hootsuite - 0
Functionality. Both offer the option to check analytics, however Viraltag analytics must be setup with Google Analytics.
Hootsuite has their own analytics. Even without me having posted anything yet, I was able to see my FB analytics. Although this isn't really anything new, because I can check that on the business end of my FB page as well.
Where Hootsuite reigns supreme on this one is the ability to create campaigns. You can run sweepstakes, photo and video contests, and encourage people to sign up for your newsletter all through campaigns.
Simply for THIS functionality, I will probably always keep Hootsuite. However, it is an upgrade to the service and doesn't fall under the FREE option.
Viraltag - 1 Hootsuite - 1
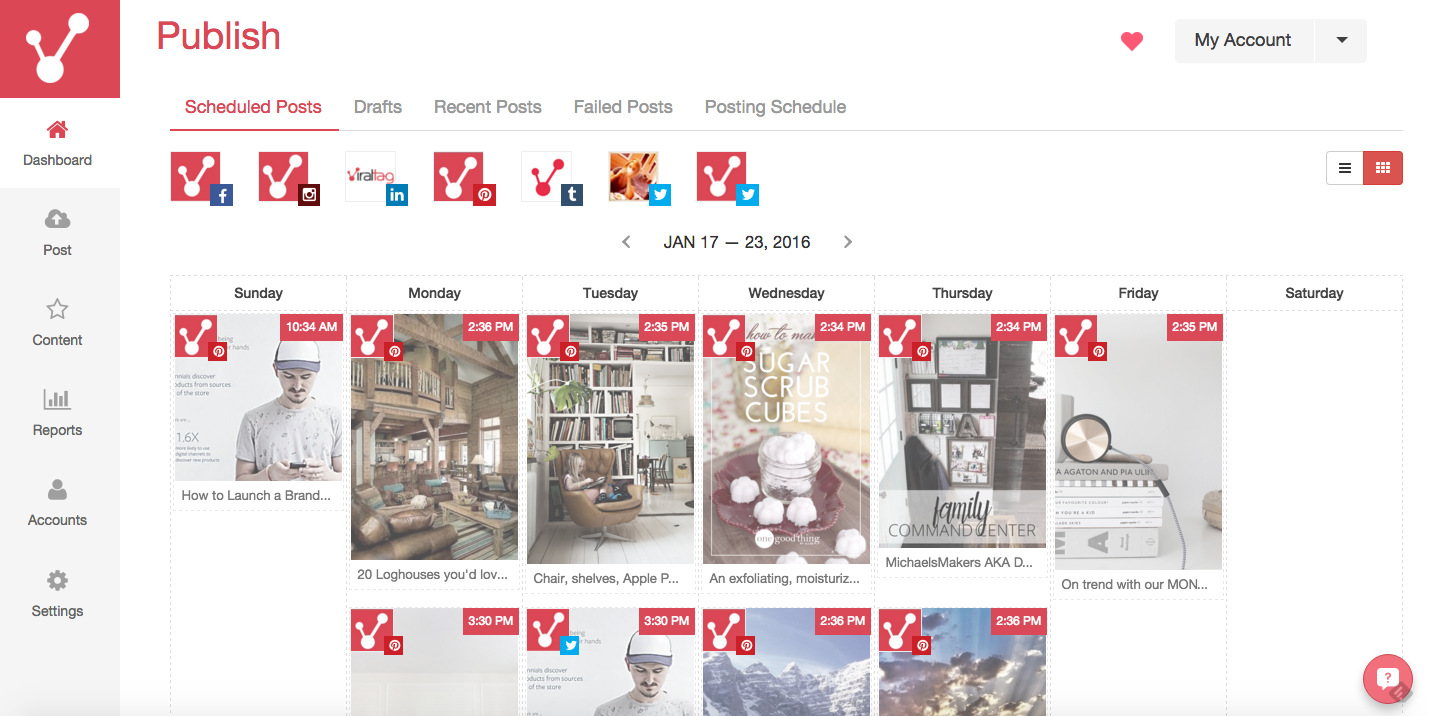
User Friendliness. This one hands down goes to Viraltag. The platform is clean and simple. A baby could do it.
Uploading bulk photos and setting them to schedule or que for later is a piece of cake.
There is also a grid view of the calendar, with the photos, so you can see exactly what is posting when.
Hootsuite allows you to upload files in bulk, but they must be uploaded as a .csv file.
If you're simply wanting to upload photos with an excerpt and have them post to multiple platforms, Hootsuite is not my choice here.
Viraltag - 2 Hootsuite - 1
Scheduling. Both allow the option to set posts in advance, duh. However, Viraltag sends a notification before anything is posted to your IG. (This is an IG regulation apparently)

At first I thought that would be annoying. The point is to save time and focus on other things...
However, when the notification pops up on your phone, you are able to edit (ADD FILTERS) to real time photos.
You already know that is of major importance. Instagram has bomb filters. I was happy I would still be able to access that with Viraltag.
Viraltag - 3 Hootsuite - 1
Followers. Viraltag has a specified 10,000 follower max. According to Social Chefs anyway.
For long term purposes, this may pose a problem.
I was unable to find any limitation for followers on Hootsuite.
Viraltag - 3 Hootsuite - 2
Price. As discussed previously, Hootsuite has an option to be free, but with limited capability.
Their base start price is significantly less expensive than Viraltag.
If you are unwilling to write a review for Viraltag, or even just want to go with a free subscription, then Hootsuite is for you.
Viraltag - 3 Hootsuite - 3
For what I am looking for RIGHT NOW...Viraltag comes in FTW.
Personally, I like their platform so much better than Hootsuite. After using it for two weeks and having several opportunities to upload photos and post and edit and do all the things, I REALLY like Viraltag.
If you choose to try it out, here are some tips I've learned.
When you upload in bulk, you must drag and drop ALL the pictures at one time. Otherwise it'll only upload the one you drag over.
I like to bulk upload and then set mine as drafts. Be careful not to click "Add to Que" otherwise you'll have to go edit every post.
Viraltag automatically sets them to post every 2 hours or something like that. I only made this mistake once...it was late...anyway it was a pain in the ass.
Click the arrow up button and select "Save to drafts."
In order to save something as a draft you must have a source URL and at least one platform selected.
If you are going to post to all your platforms AT DIFFERENT TIMES, I recommend selecting them ALL during this process. When you go to view your uploaded photos in your drafts, all the same picture will show up in a row, each with a different platform icon in the right hand corner.
From there you can go edit post times and the rest.

Now, if you are posting a picture and want to use the IG filter for your FB post as well, I recommend only saving to drafts as an IG post. From IG you can toggle on the "Facebook" option to post to both from there.
If you are going to post to all your platforms AT THE SAME TIME, you can just select one platform to save as a draft. When you go edit your draft, you'll click the edit button to add text, edit the source link, and in there you can also click the other platforms.
This way you're only editing a draft ONCE.
I copy and paste the text from one draft to the next because I post all my content at different times according to what research claims are the best post times.
The source URL for all my Pinterest posts goes back to my IG account. Because I do it this way, I first have to post to IG and then later I go add the source URL into the Pinterest draft and schedule that to post.
If you are posting picture you have made yourself - memes, photos of your work, etc - only pinterest requires a source URL.
If you are posting pictures you have snagged off Google, both FB AND Pinterest require a source URL.
No IG post requires a source URL. I usually delete this after I've uploaded everything to be saved as a draft.
If you post a picture and it needs to be cropped, rotated, sharpened, or any edits need to be made you can do that ON the platform.
I accidentally posted pictures that needed to be rotated and didn't realize you could edit in there, so I deleted them, rotated them, and then re-uploaded them.
Waste of time. Just click the yellow star in the bottom right corner of the pic that'll say "enhance photo" when you hover. You can make those edits in there.
I'm still figuring this out, so there should be updates in the future, but for now, I hope you enjoyed this read!
UPDATE!
So I did my own research a while back about what times are best to post to each social platform and I've been using those times to make my posts.
If you have Google Analytics, you can link this to your VT account (which I'm sure you've already done or recognized by now.)
But anyway, I finally linked mine about two weeks ago and I discovered an awesome thing today!
I didn't really understand what the "Posting Schedule" was at first. If you click on it, you will see there are a select number of post times selected already for you.
Well, if you delete all those times and then click "Get Recommended Times" you can select X number of times per day.
With your Google Analytics linked, it will track when each individual account is getting the most traffic when.
What I have been doing when I schedule my posts is physically selecting a day and a time for each post.
I usually schedule multiple days of posts at a time and so I just keep track of what I'm doing when OR I just refer back to my schedule to make sure I like how I've set it up.
Today I discovered that if I have a "Posting Schedule" set up (with the times from my recommended times) I can just click "Add to Que" and the posts will fall in line according to the schedule and in the order that I add them.
This is really something super simple that I just happened to overlook, but hey, I'm a busy lady with a lot on mind.