Do you have a skincare goal?
I certainly do.
It is my ultimate skincare goal to never wear makeup.
Let me rephrase: To never need to wear makeup.
Don't get me wrong... I think makeup is fabulous.
My best friend and I used to sit in her closet and spend HOURS doing makeovers on each other.
And I know we weren't the only ones.
The thing is, even if you don't actually like makeup, you probably like the idea of makeup.
The endless possibilities. The sparkle. The colors. The end result.
Whether you like makeup or not isn't the issue here though...
The issue is: who has time for it?
Today's post relates to one specific way to save time and hassle with your daily beauty/makeup routine.
It's the number 1 technique I use to get towards my no makeup goal.
Enter: Eyelash Extensions
There's a lot of confusion out there about lash extensions.
And a lot of misinformation.
Unfortunately, there aren't many places you can go to find good info.
Until now.
::Cue drumroll::
The following is an all-inclusive, all-encompassing guide to eyelash extensions.
We will cover what to expect from your lash appointment, how to prepare, lash aftercare, when and why we choose what styles, and more.
We leave no lash stone unturned. So buckle up, you're in for a fabulash ride!
WHAT ARE EYELASH EXTENSIONS?
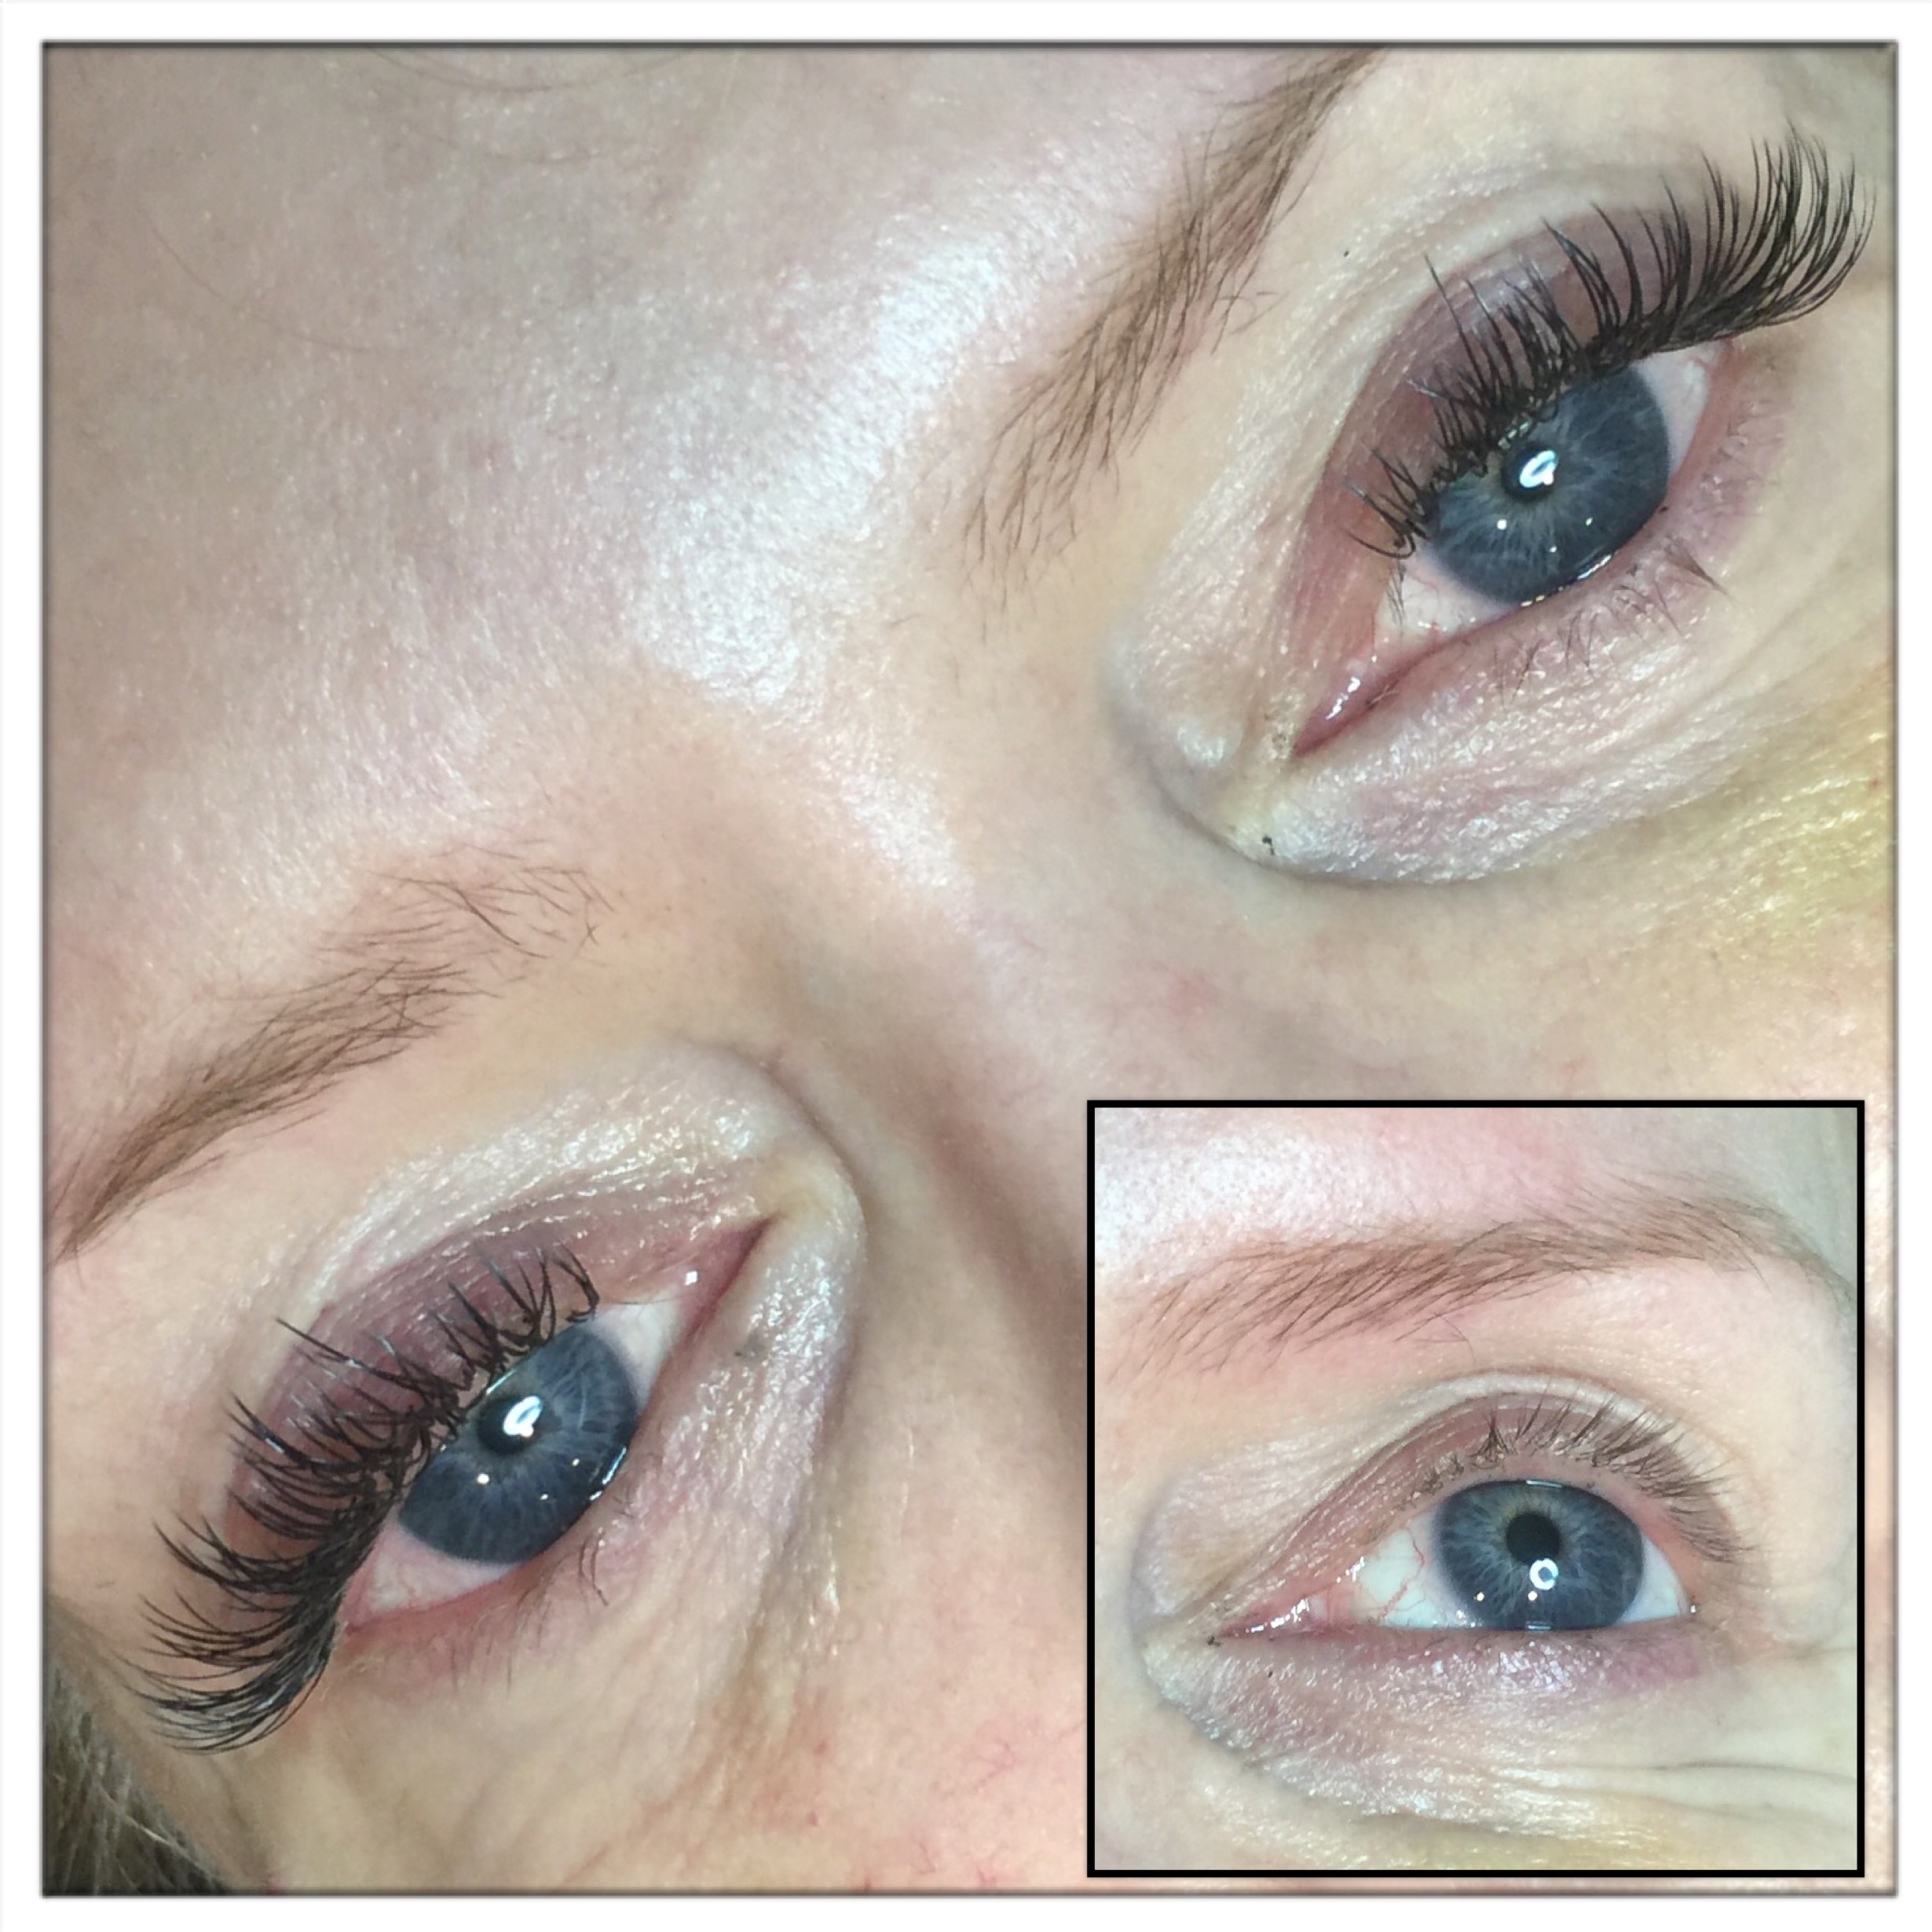
Eyelash extensions are a semi-permanent enhancement, in which one synthetic lash is individually applied to one of your natural lashes.
With classic lashes this is a 1:1 ratio. With Russian volume this can be up to 6:1.
(To read more on the difference between classic lashes and volume lashes click here)
Lash extensions are an alternative to strip lashes, mascara, and cluster lashes.
They leave your lashes looking fuller, thicker, and longer without any maintenance between fills.
What is an eyelash service like?
The process itself is quite luxurious and relaxing.
You should arrive to your appointment eye makeup free. Any residual oils or makeup will break down the adhesive bond and cause the extensions to fall off prematurely.
Your stylist will consult you on the look you wish to achieve and will advise on a realistic outcome.
Many factors play into how your lashes can be styled, but ultimately your natural lashes are the rule makers.
Upon completion of your consultation, you will be instructed to lay back on a plush bed, where hydrating eye pads will be applied to your lower lashes to separate them from the upper lashes.
The gel pads serve two purposes here:
1. Keeps the lower lashes from entangling with the upper lashes, thereby preventing an extension from being attached to a lower lash.
2. It gives your artist an area to work and place her tweezers.
Your stylist will be using 2 needle nose tweezers to separate, pick up, and apply your extensions.

The newly launched borboleta tweezers!
After applying the hydrating pads you will be instructed to close your eyes for the remainder of the service.
The initial application can take anywhere from 90 to 150 minutes for classic lashes and 150 to 240 minutes for volume, depending on the stylist. I recommend taking a trip to the restroom before you begin your service.
Because the service is quite relaxing, many clients fall asleep during this process. (A compliment to us, quite frankly!)
Your stylist will alternative between eyes, skipping lashes between attachments, until she has completed the desired result.
At my salon I use a clear sealant that reinforces the bond of the adhesive to finish. After this, a handheld fan is used to ensure the adhesive is completely dry.
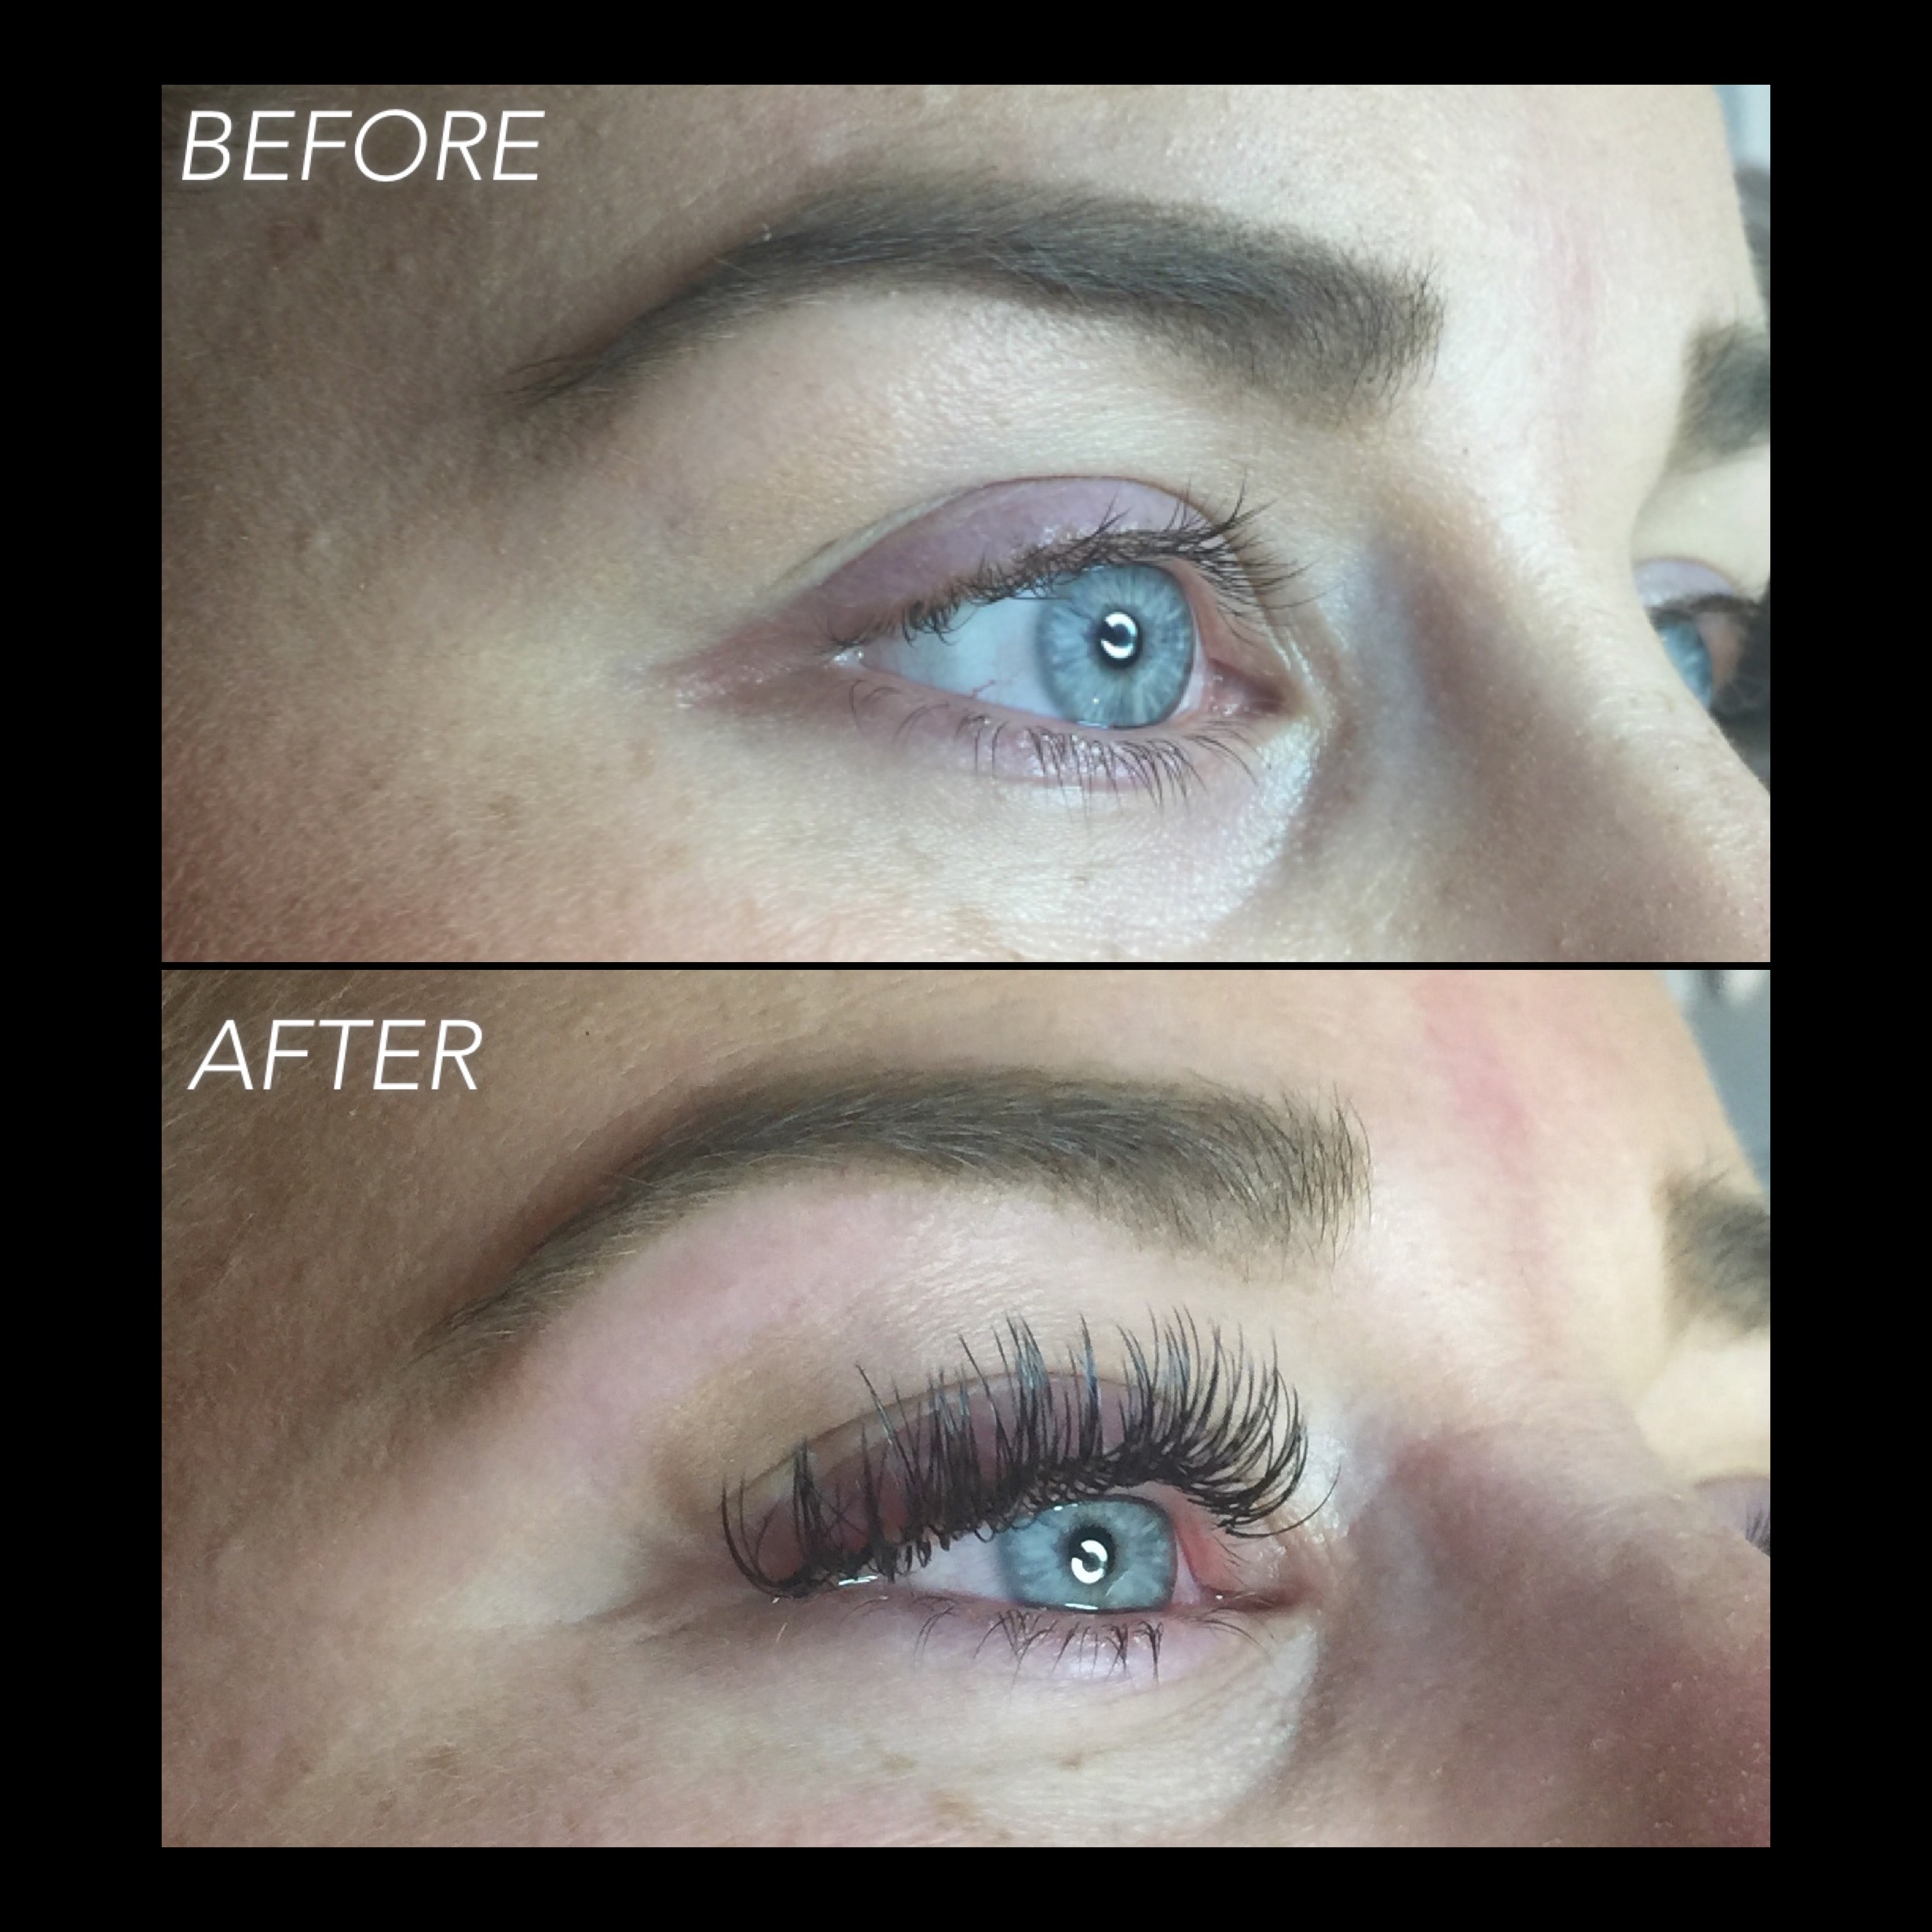
The pads are removed, and you are free to open your eyes and admire your beautiful new lashes!
But before we get too ahead of ourselves, what's all this talk about extensions damaging the natural lashes?
Do eyelash extensions damage the natural lashes?
It is a common misconception that eyelash extensions damage the natural lashes.
That's kind of like saying cooking your food will burn it.
Well, surely, if done improperly.
A lash stylist is more than just a stylist. She is an artist. And she should be proud of her work.
There are many lash "artists" out there who practice improper adhesive control, improper isolation, and do not check their work before they are done.
These "artists" are giving the industry a very bad name.
With proper technique and application, lash extensions are anything but damaging.
Ultimately, it is your natural lashes that will determine what can be done with your extensions. This is why having realistic expectations is so important.
If you have naturally long, thick, and dense lashes, then that's exactly what you can get with classic eyelash extensions.
If you have short, brittle, or sparse lashes, your extensions will be an enhancement to this, but they will not turn out looking like Kim Kardashians' do.
Fortunately for those of you with the latter, there is a new technique to achieve full, fluffy, and dense lashes without damaging the natural lashes.
This is what is known as Russian Volume lashes. I explain this in detail further in the article.
So what actually damages natural lashes?
It's all in the technique baby.
Eyelash extensions come in a variety of lengths, diameters, and curls. Natural lashes are exactly the same.
When your natural lash is very thin in diameter and an extension is applied that is very thick in diameter...this can damage the natural lash.
When your natural lash is very short and an extension that is too long is applied...this can damage the natural lash.
If the weight (diameter or length) of the extension is too heavy for the natural lash this can lead to a premature lash shed. The weight of the extension can cause the natural lash to be pulled from the follicle before it is ready to shed.
This works in the same way as over-tweezing brows. The more a hair is pulled from a follicle without naturally shedding, the more likely the follicle is to be damaged.
Once a follicle is damaged, it will no longer be able to produce hair, thus resulting in more sparse lashes over time.
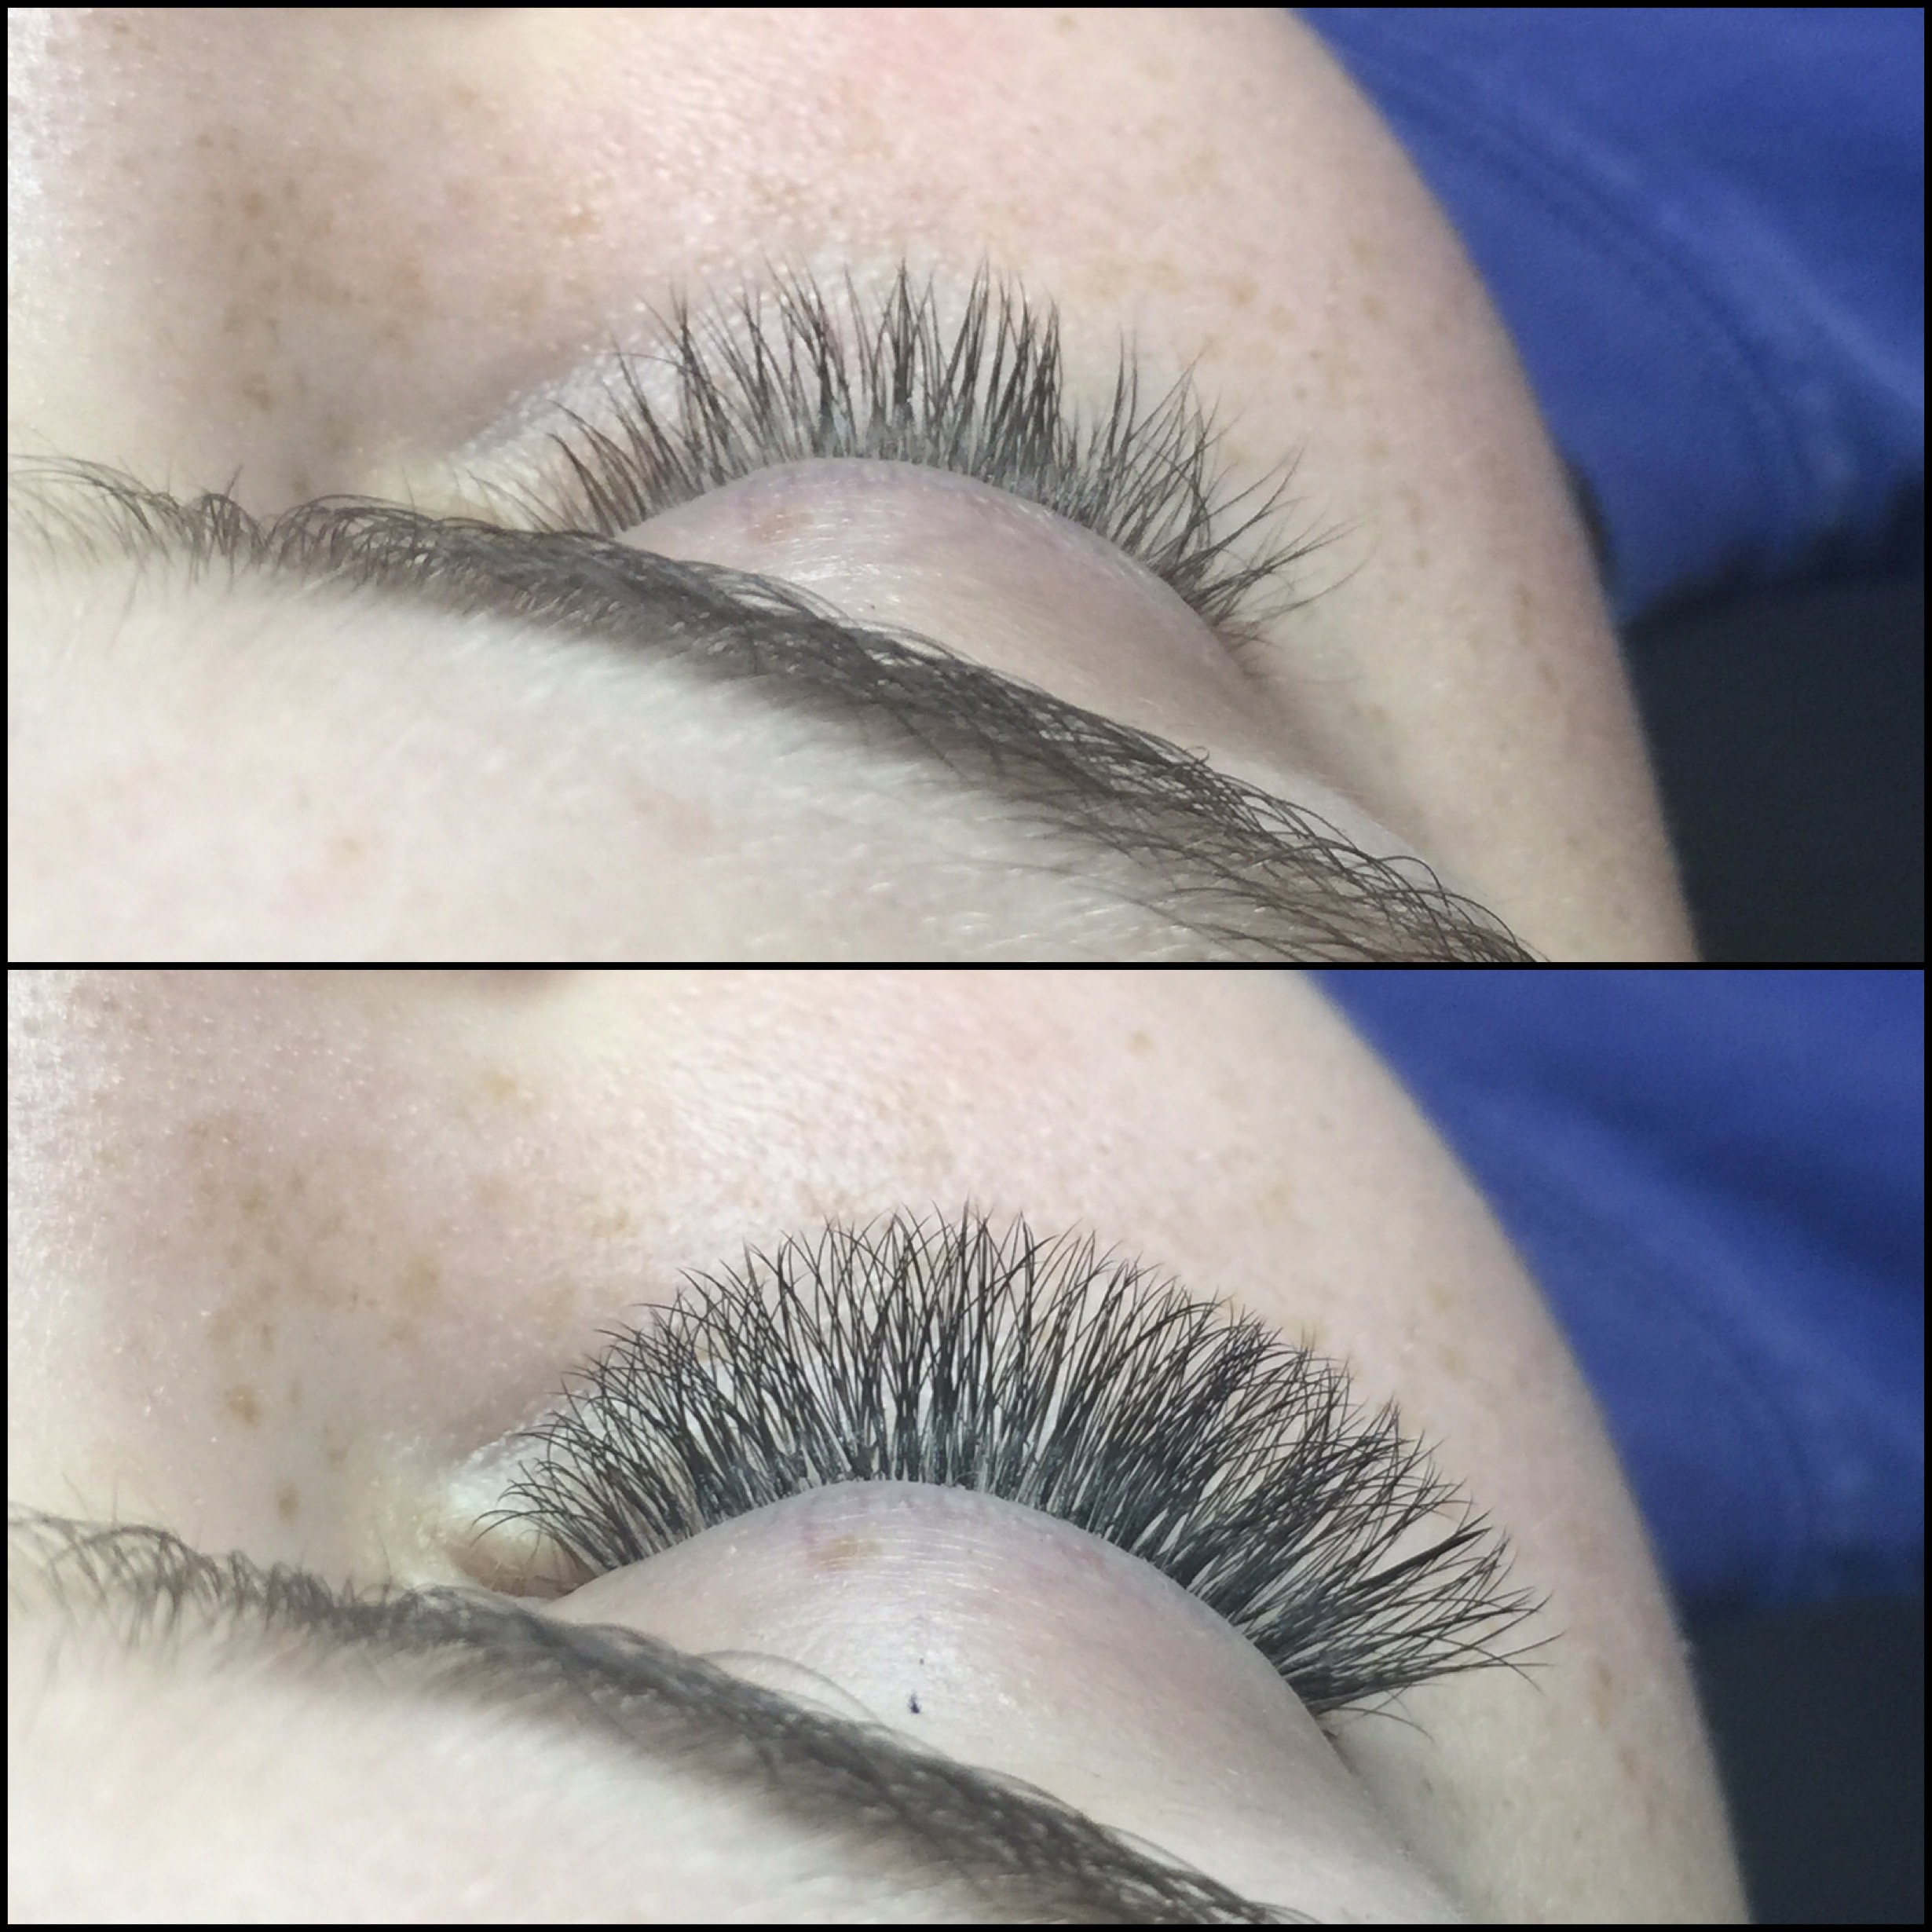
When an extension is applied that is too far from the base of the lash line...this can damage the natural lash.
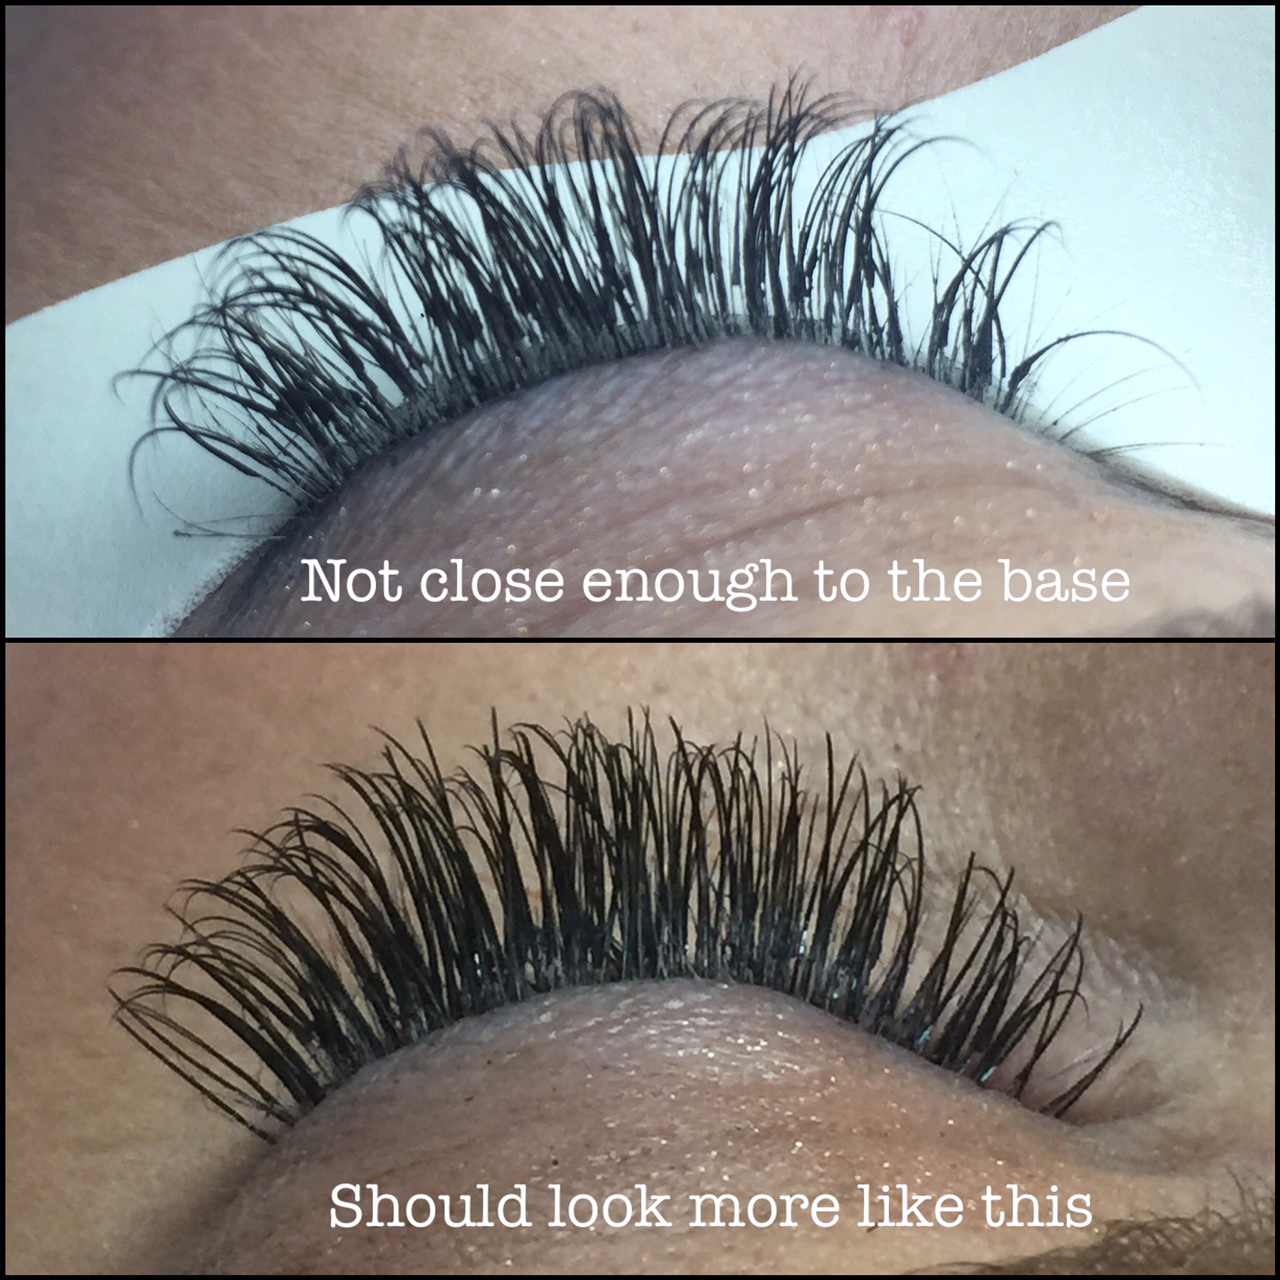
You can see the distance between the lash line (where lashes meet the eyelid) and where the base of the extension starts. This is what healthy growth will also look like. Lashes that become grown out like this need to be removed during fills.
The natural lash will be stressed by the weight load and can cause premature shedding.
Lash extensions should be applied no closer than 0.5mm to the base of the lashes and no farther away than 1mm.
When multiple extensions are stuck together...this can damage the natural lash.
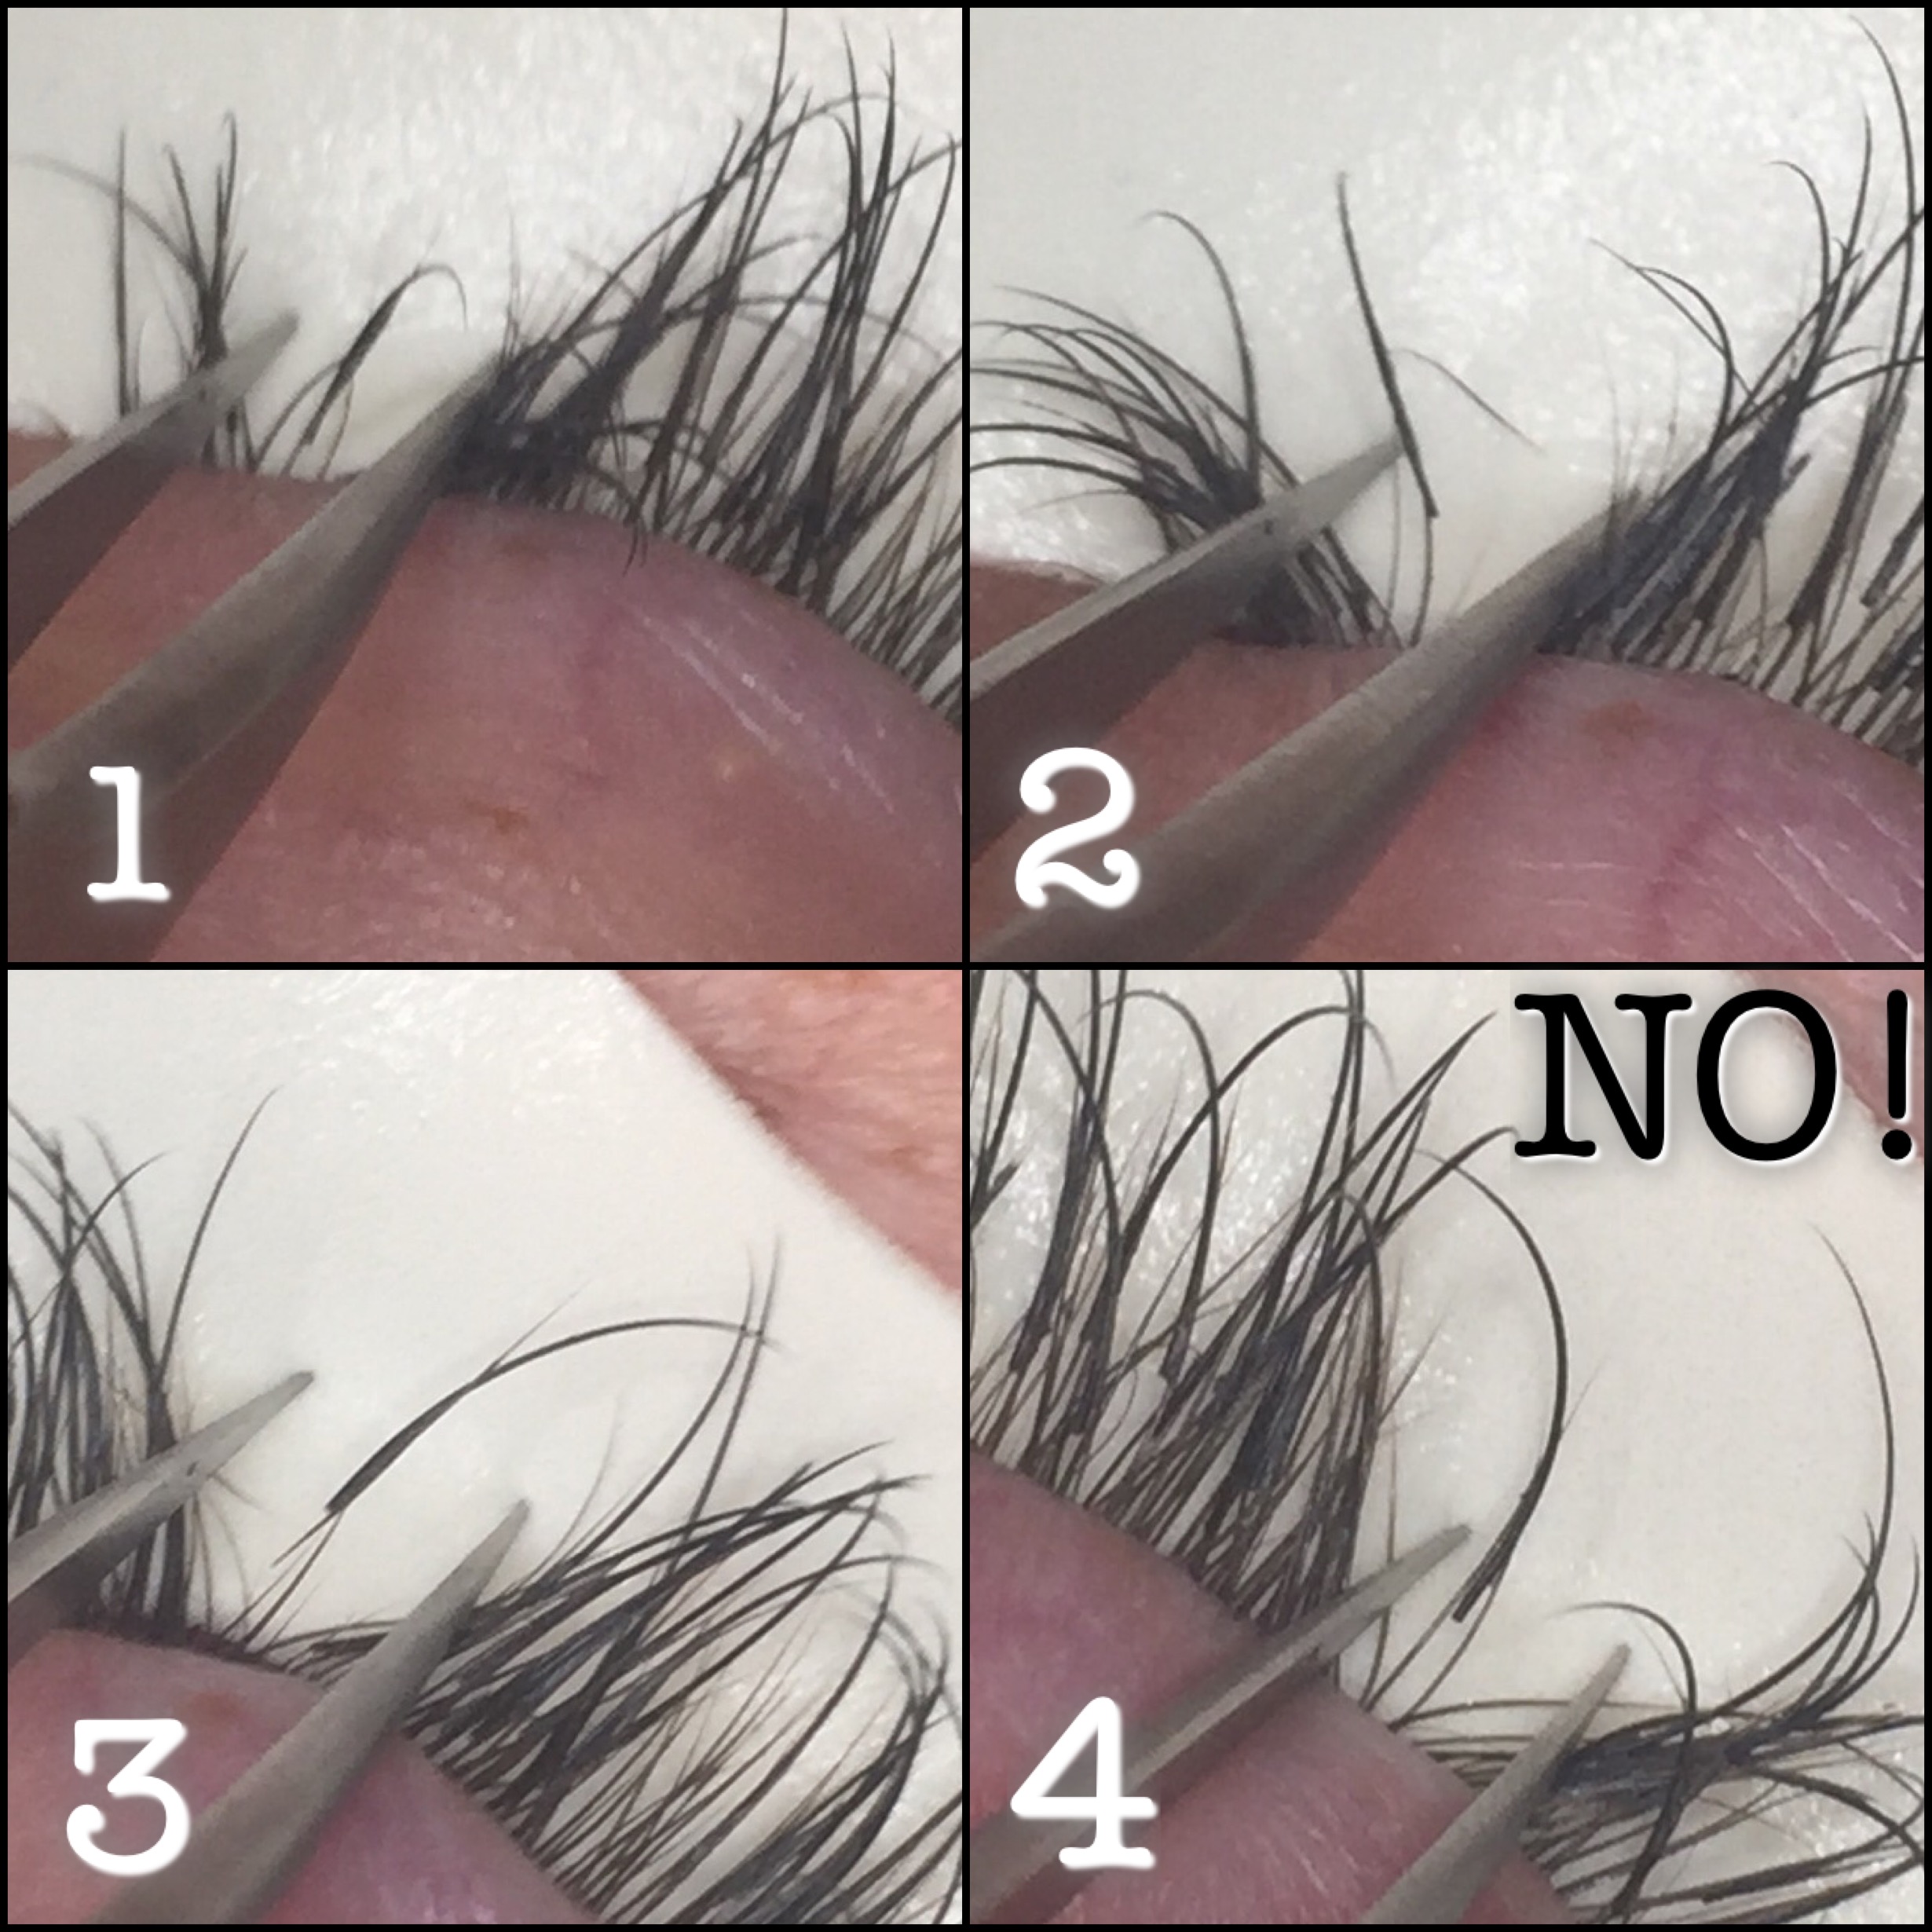
So you have a couple of extensions next to each other that have become attached, what happens?
Let's say the natural lash in the middle is ready to shed, but those next to it are not. The middle lash is going to shed whether you want it to or not. The extension attached to it that is connected to a neighboring lash, will pull on it's neighbor, causing force to that follicle.
This will stress the neighboring lash and cause it to also be pulled from the follicle. Now you have multiple natural lashes that have shed out, when only one was ready to do so.
This is where artistry comes in. A stylist who practices safe and proper technique will not be making these types of mistakes.
These mistakes are what cause lash damage. Not the application of extensions itself.
So just like properly cooked food tastes amazing.
Properly applied lashes look amazing.
(To read more about the lies you've been told about lashes click here)
So how do you choose the best lash artist?
Like any other beauty service, eyelash extensions are a treat. A lot of trust is going to be placed in someone that you may or may not know.
That can be a scary thing...
but it doesn't have to be.
With Instagram, Facebook, Yelp, and Google, finding a quality lash artist is right at your fingertips.
Here are 6 steps to help you find the best lash artist:
1. Do some basic research. Research pricing in your area to find what the going rate is.
A lot of things will determine how a stylist has set her pricing.
Zip code, experience, and competitors are the 3 main pricing parameters.
The most expensive artist is not necessarily going to be the best. But keep in mind, great lashes aren't cheap, and cheap lashes aren't great.
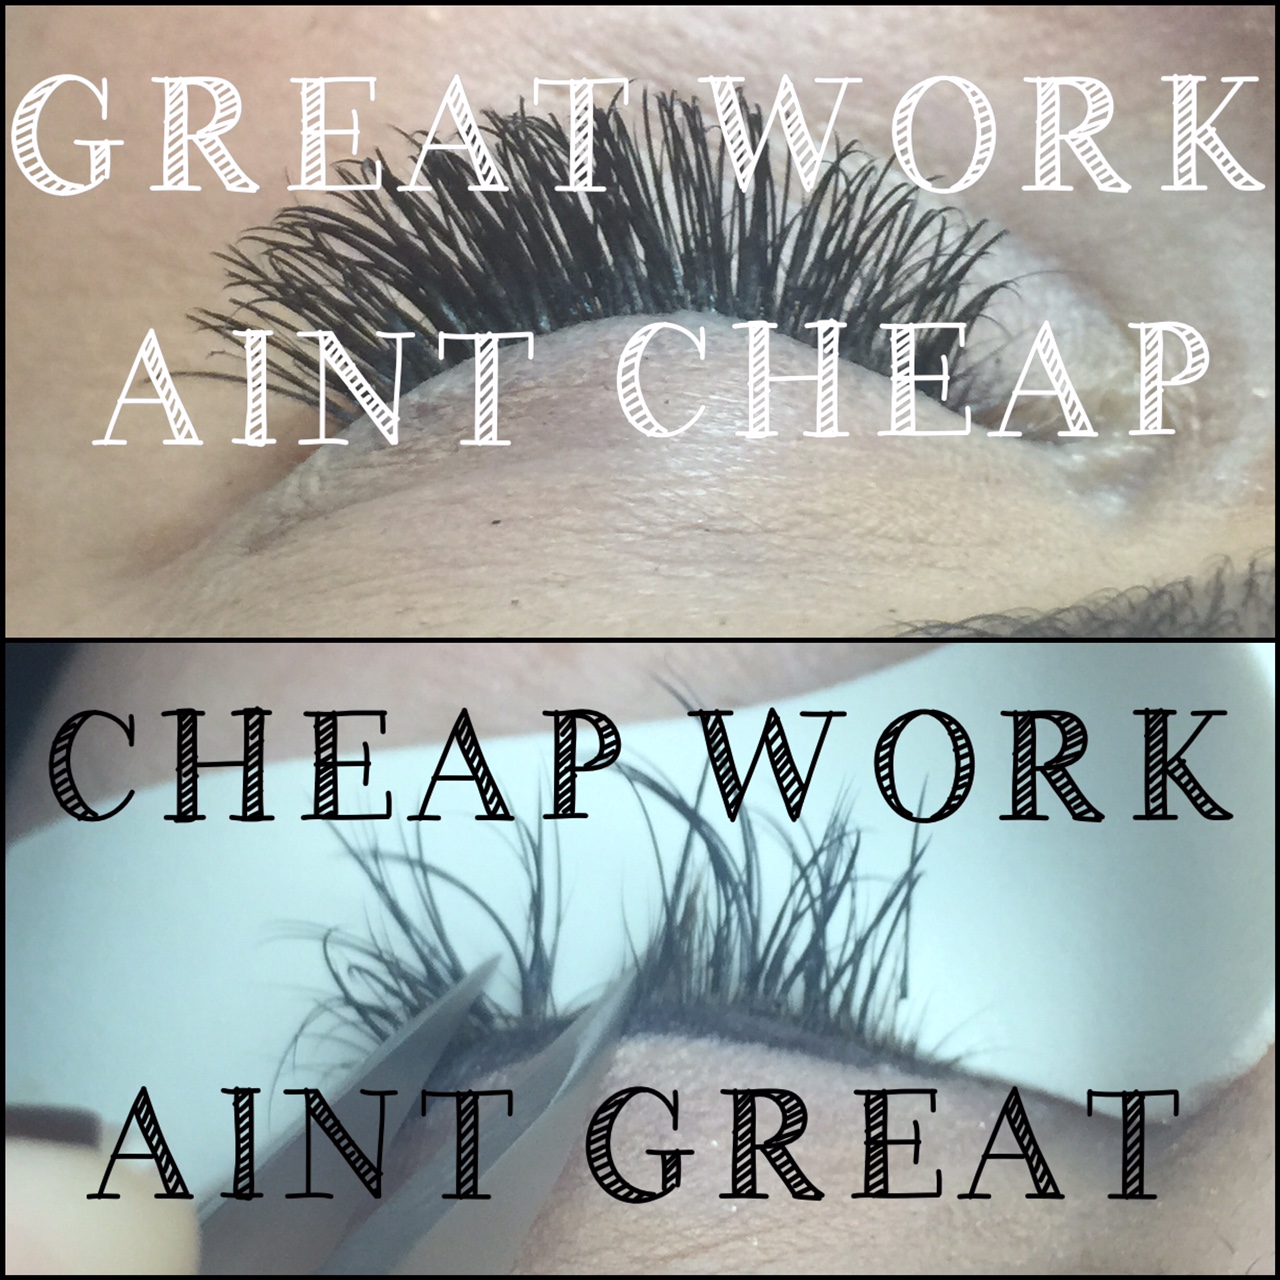
You are making an investment here ladies. Always choose quality.
2. Get a referral.
There's a lot that you can learn from them.
You're going to be spending a lot of time with your stylist.
Lash fills take 60-90 minutes and are recommended every 2-3 weeks.
At minimum, that's about 2 hours a month.
You can find out what the stylists personality is like and if you think you are going to enjoy her company.
Not that this is mandatory. I would take someone who had an awkward personality, but was a badass at lashing over someone who had a badass personality, but was a sub-par lash artist.
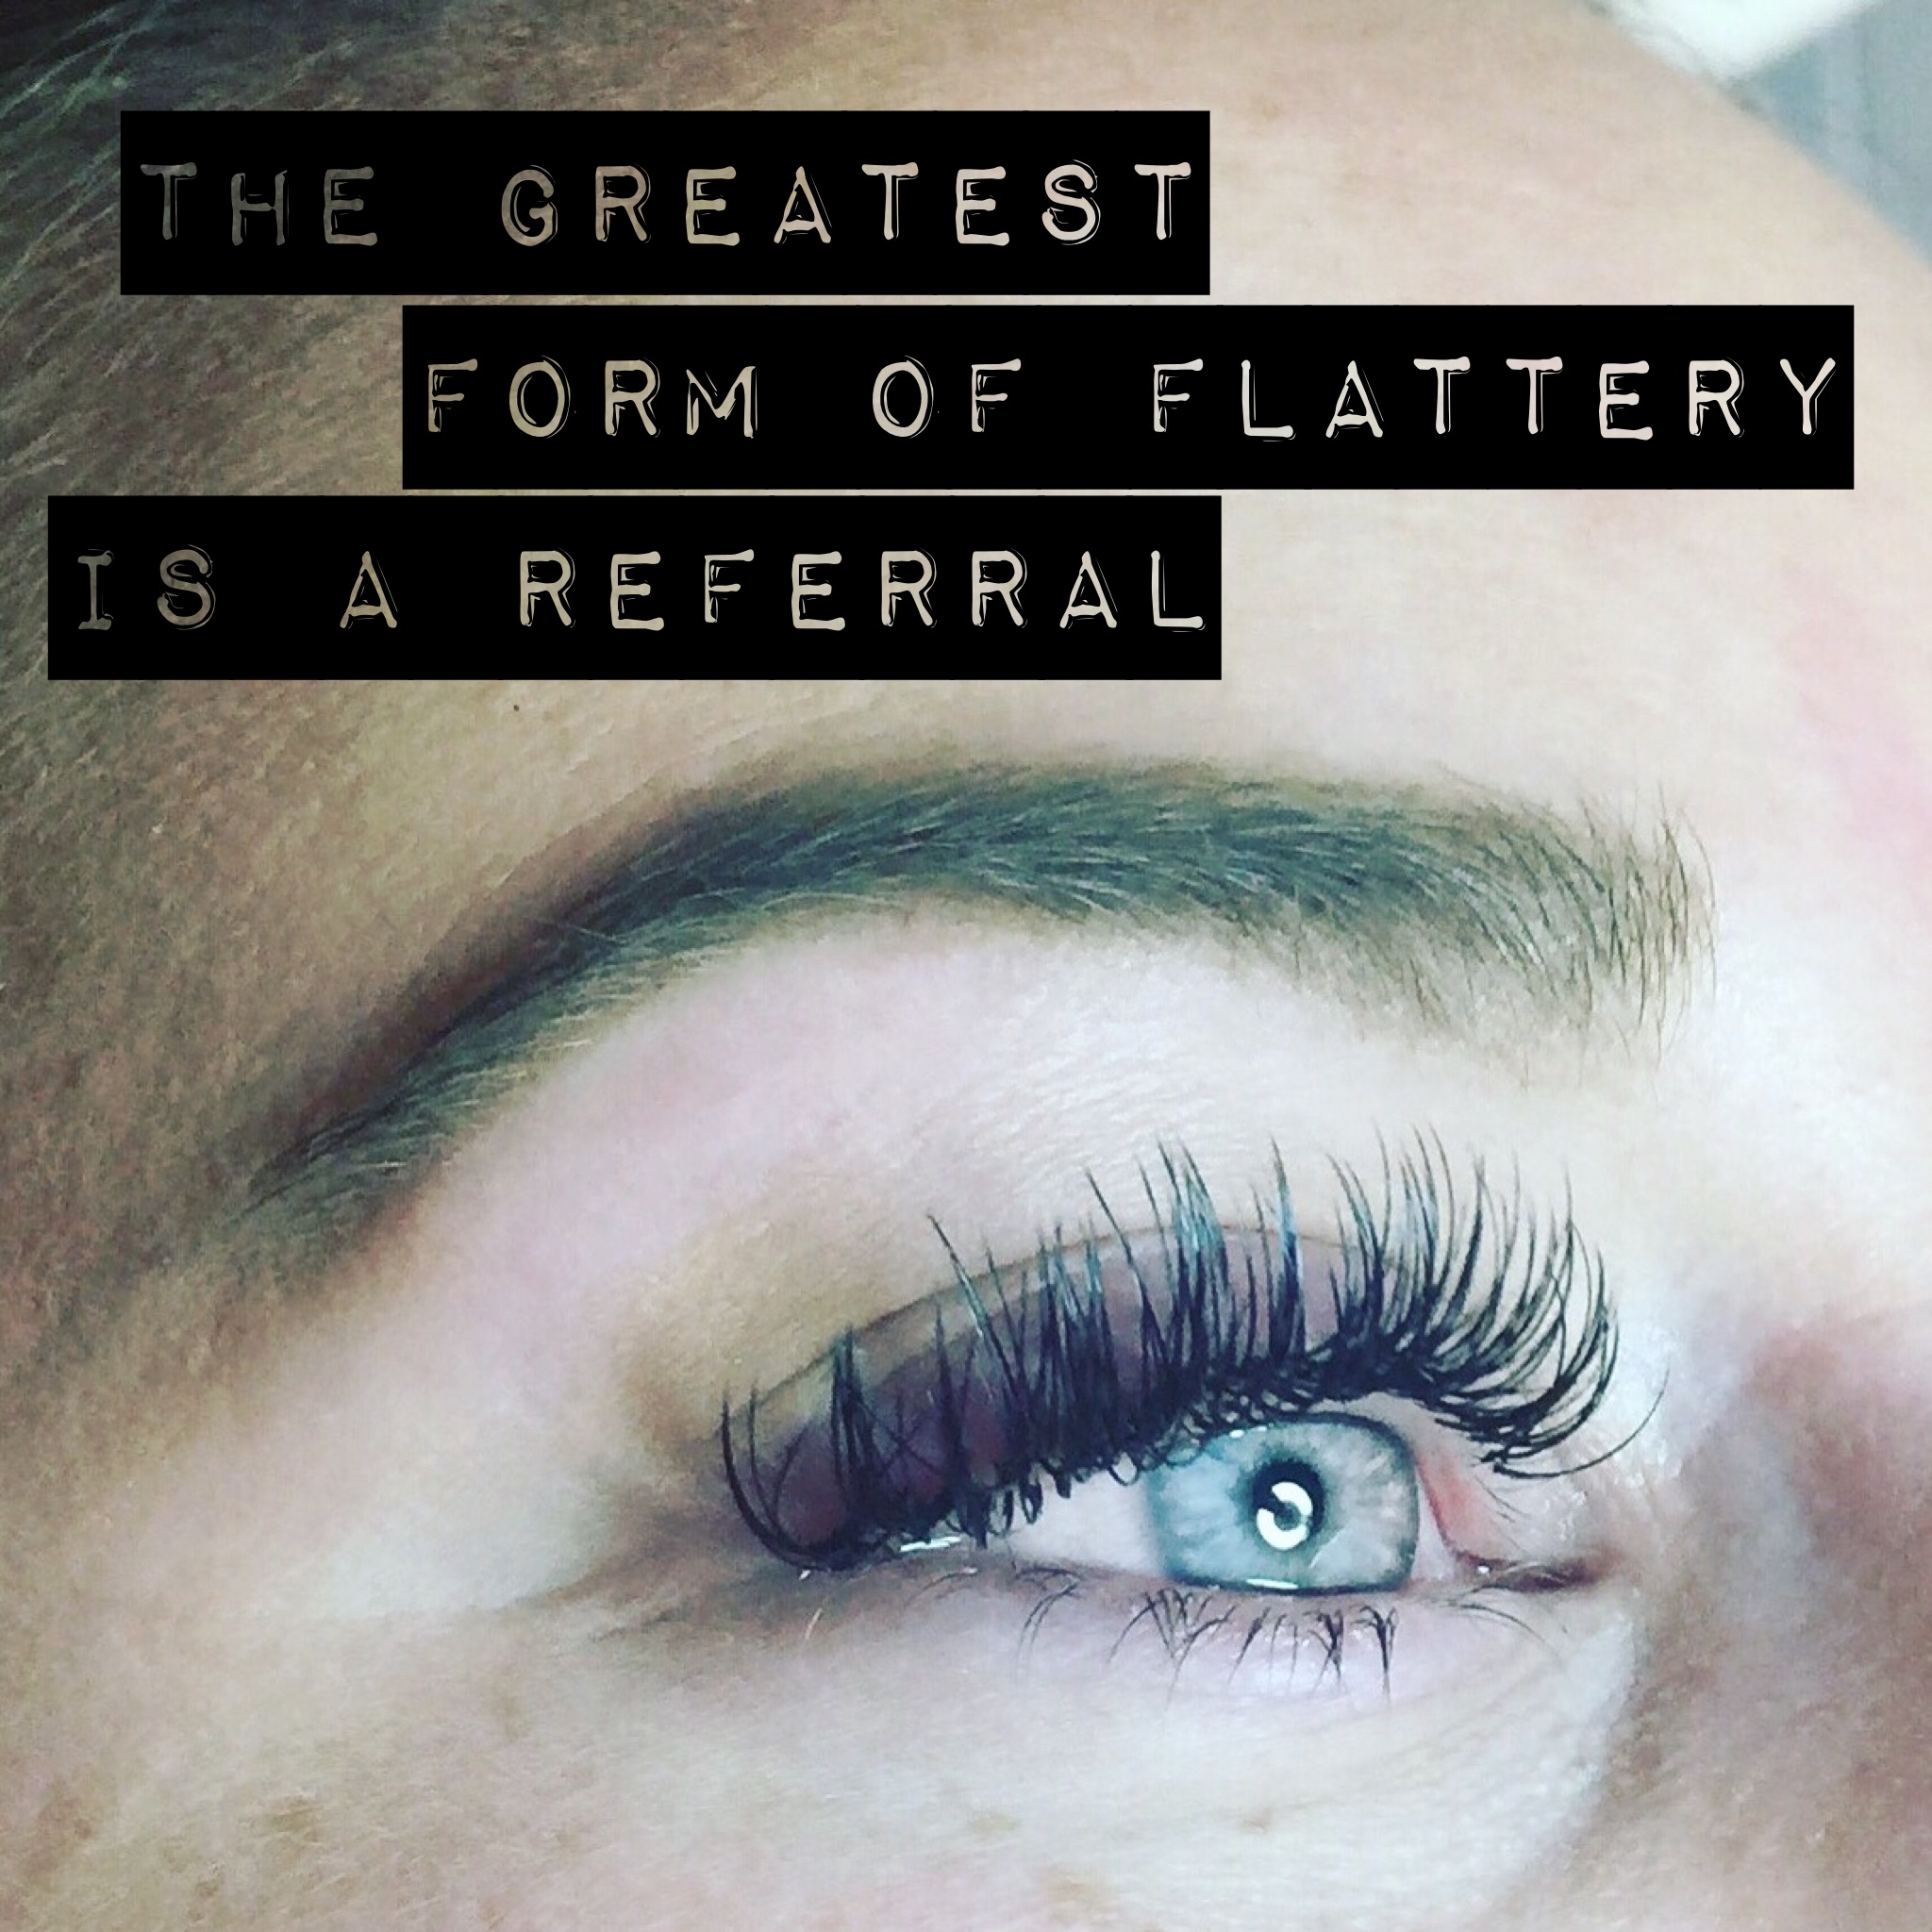
Referrals are great because they help you know what to expect.
3. Check portfolio pictures.
True artists are proud of their work and will have photos readily available for you to browse through.
4. Or better yet, check out their Instagram.
Instagram is awesome because its real time and quality artists will be posting frequently.
5. Read reviews.
See what their current clients think of them. Check Yelp, Facebook, and even the comments on Instagram.
6. Come prepared with all your questions.
Hopefully this guide will answer any and all of those, but every quality artist will be well prepared to answer a multitude of questions about the process, training, and aftercare.

So, you've found the one.
You know she's good and your lashes won't be damaged.
You can visualize the entire process you understand it so well...but what about after?
How to care for eyelash extensions
Just like any flourishing, healthy relationship takes nourishment and care, so does your relationship with eyelash extensions.
Here are 16 lash extension aftercare tips:
- Do not get the extensions wet for the first 24 hours.
- Avoid oil based products on and around the eyes.
- Avoid touching the lashes. Your fingers contain oils and dirt that will break down the adhesive.
- Always be gentle - avoid picking, pulling, or rubbing on the eyes or the extensions.
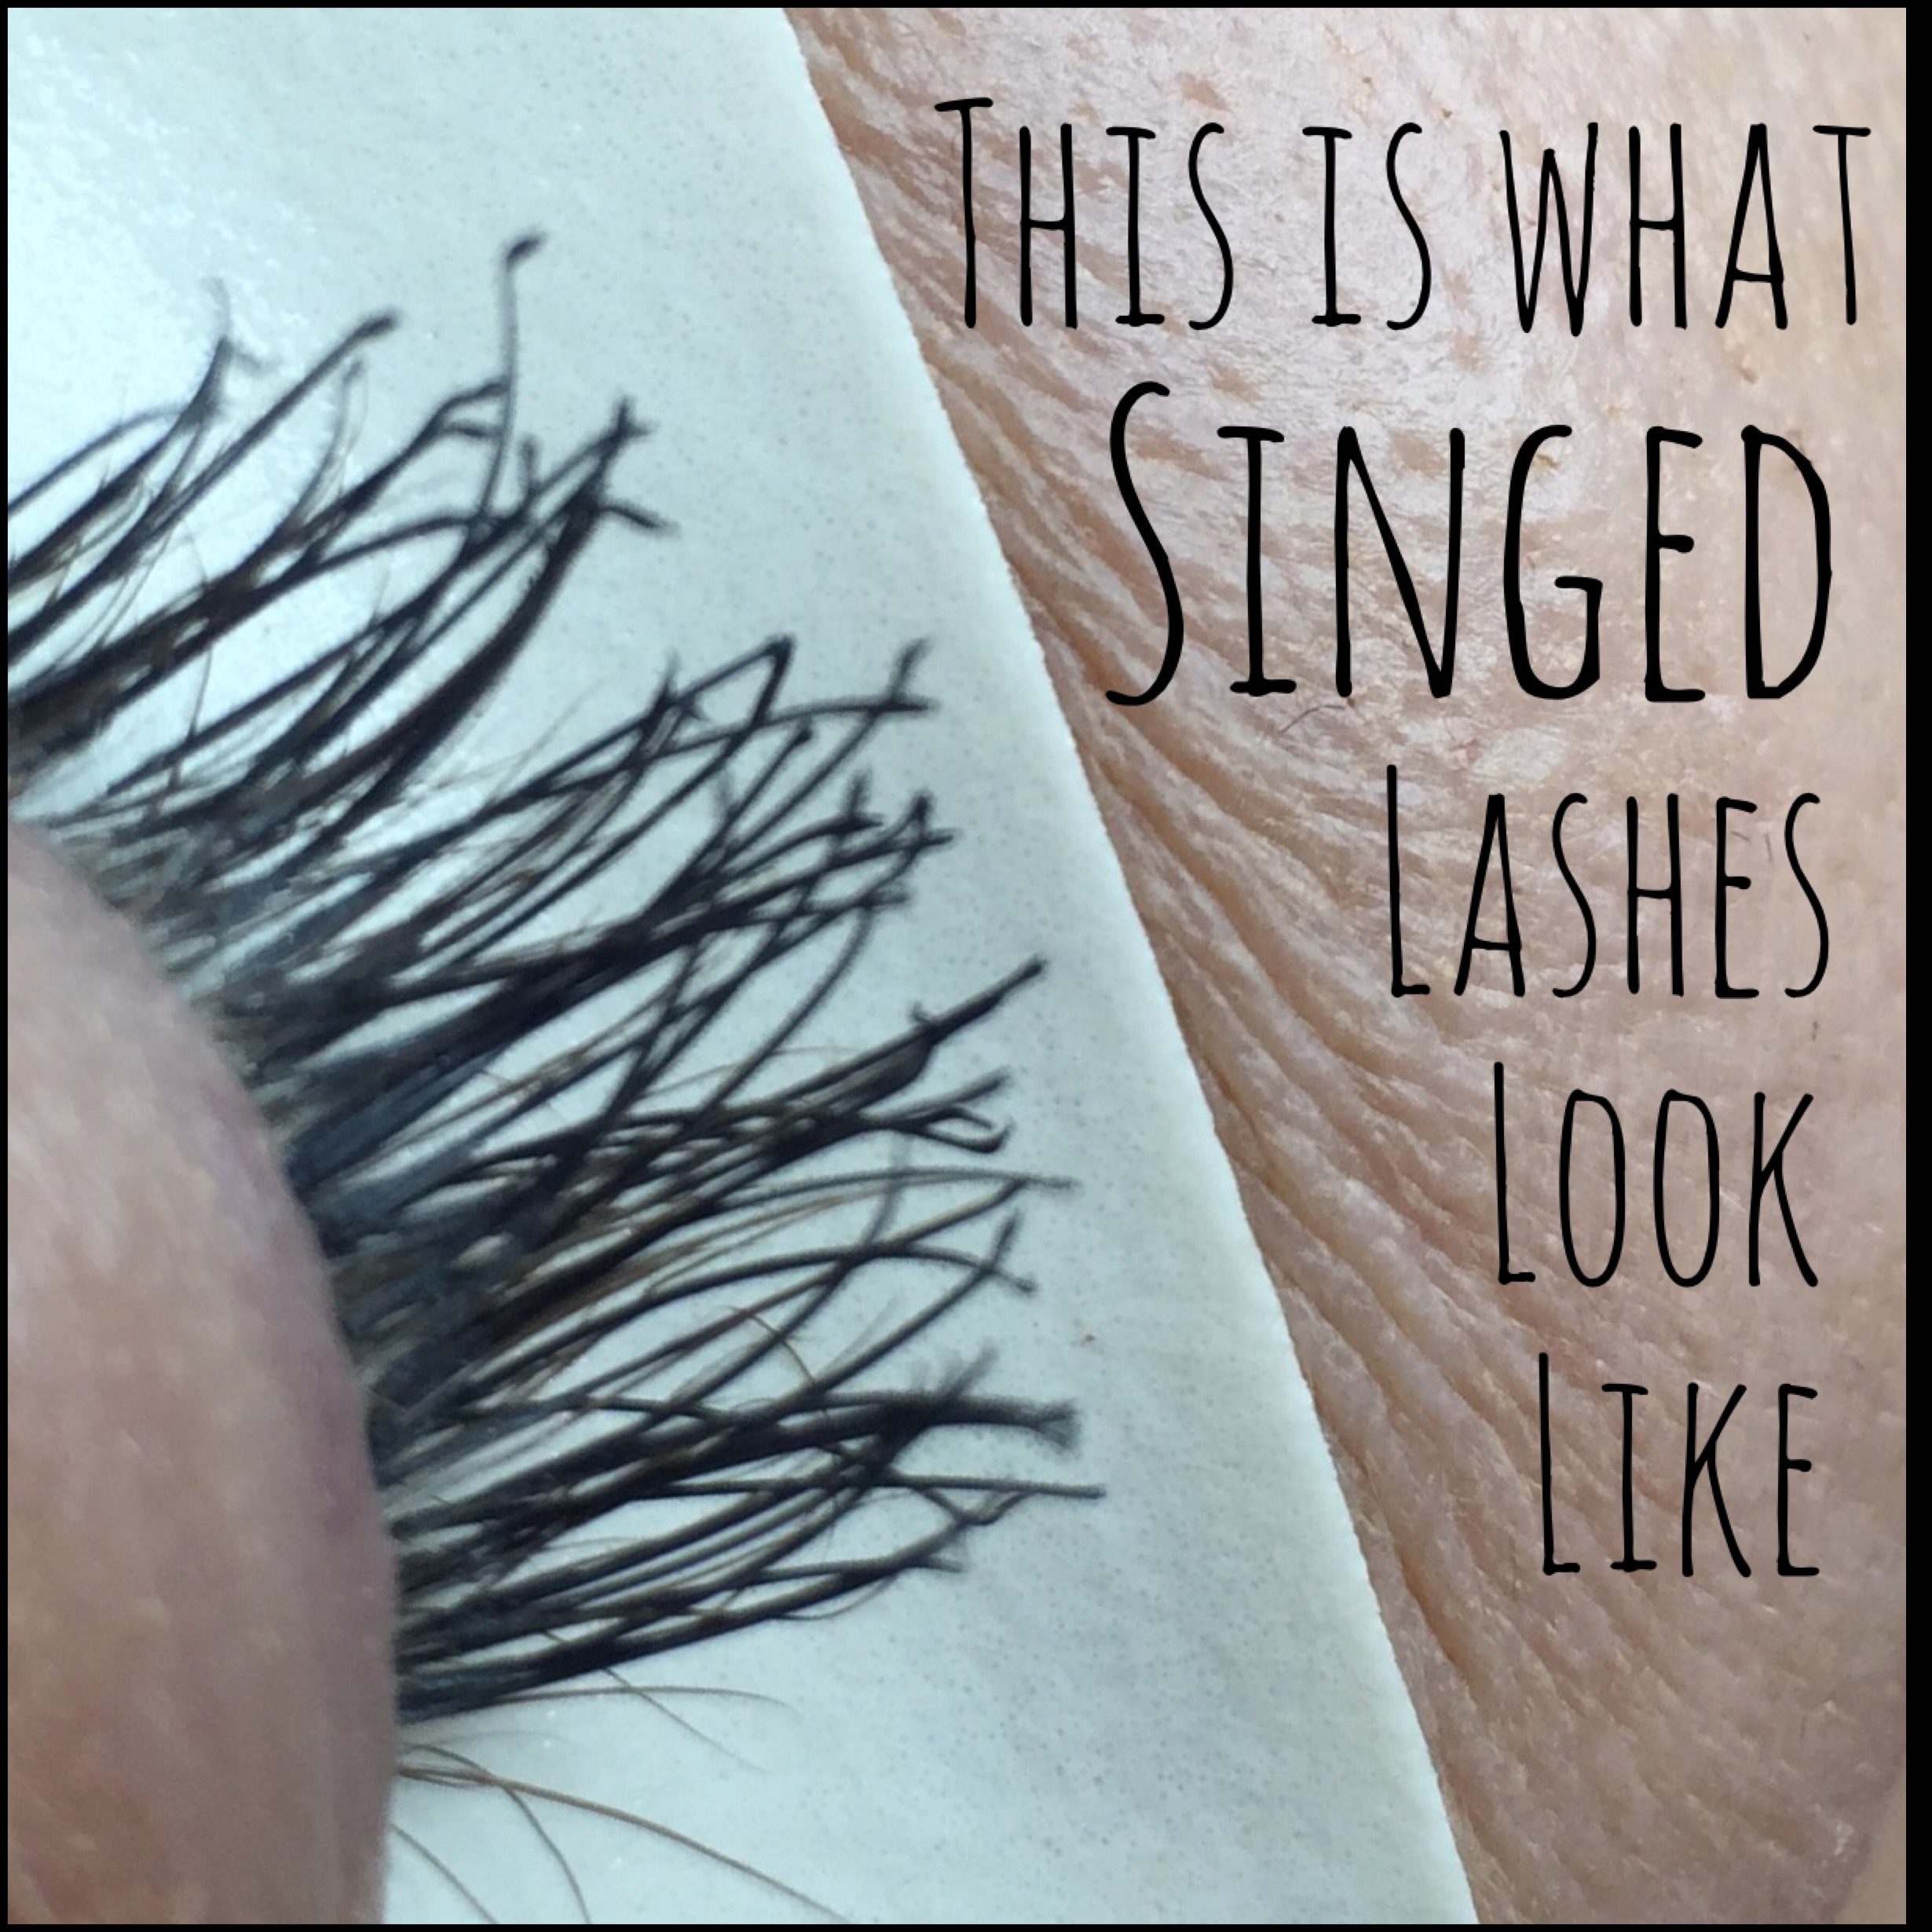
- Keep your pretty face away from the heat of the oven or lighters.
- Your lashes will need to cleansed with warm water daily. They will require a good shampoo at least 2-3 times a week. (After the first initial 24 hours, of course)
- If you must wear mascara, absolutely NO waterproof. Only use a water based mascara.
- Apply from the middle of the lash to the tip. Avoid the base of the lashes - this will cause the adhesive to break down.
- If you feel the need to do this, you may want to discuss adjusting the look of your lashes with your stylist.
- NEVER apply mascara to Volume lashes. It closes the fans.
- Tint the lashes at least 24-48 hours prior to application.
- Do not sleep with your face down on your pillow.
- Purchase a silk pillowcase if you are a wild sleeper. They are more gentle on the lashes.
- Do not perm your lashes.
- Brush your lashes only when they are dry.
- Avoid cotton balls or lint-containing products on the lashes.
- Only use a heated eyelash curler, or ask your stylist if she can adjust the curl of your extensions.
- When asked, "Are those your lashes?" Lie and say Yes! After all, you paid for them!
(Click here for tips on cleaning your lashes.)
You've learned a lot about extensions so far.
You know they don't damage your natural lashes.
You know what to expect during your service.
You've got a plan to find the best lash stylist.
And now you know how to take care of your extensions.
eyelash extension styles
I mentioned earlier that there are different lengths, curls, and diameters.
I also mentioned earlier that your natural lashes are the boss. They determine how long, how thick, and what curl will be selected.
So lets talk the different lengths first.
To my knowledge, the longest extensions are 18mm, but according to Borboleta Beauty, there are companies that sell 24mm lengths.
Everything is measured in mm. Both lengths and diameters.
18mm is obnoxiously long. I don't carry anything past 15mm at my salon.
Lengths vary from 7mm to 15mm. The shorter lengths are always applied on the inner corners, or on clients with very short natural lashes.
Your stylist will make the final decision on what your natural lashes can handle.
Remember, we don't want to damage your natural lashes.
What about lash curls?
This has actually become one of the most fun parts of applying lash extensions.
In the beginning there were only 2-3 types of curls. The most common was a J curl. Then it was the C curl.
Now, a C curl is still probably the most common overall, but my clients wear a variety of curls.
Lash curls are named to emulate what they look like. So when you hear "J curl" think of what a J looks like.
When you hear "C curl" think of what a C looks like, and a "D curl..."
yup, looks like a D!
There are J curls, B curls, C curls, CC curls, L curls, L+ curls, LU curls, D curls, and some places have DD curls.
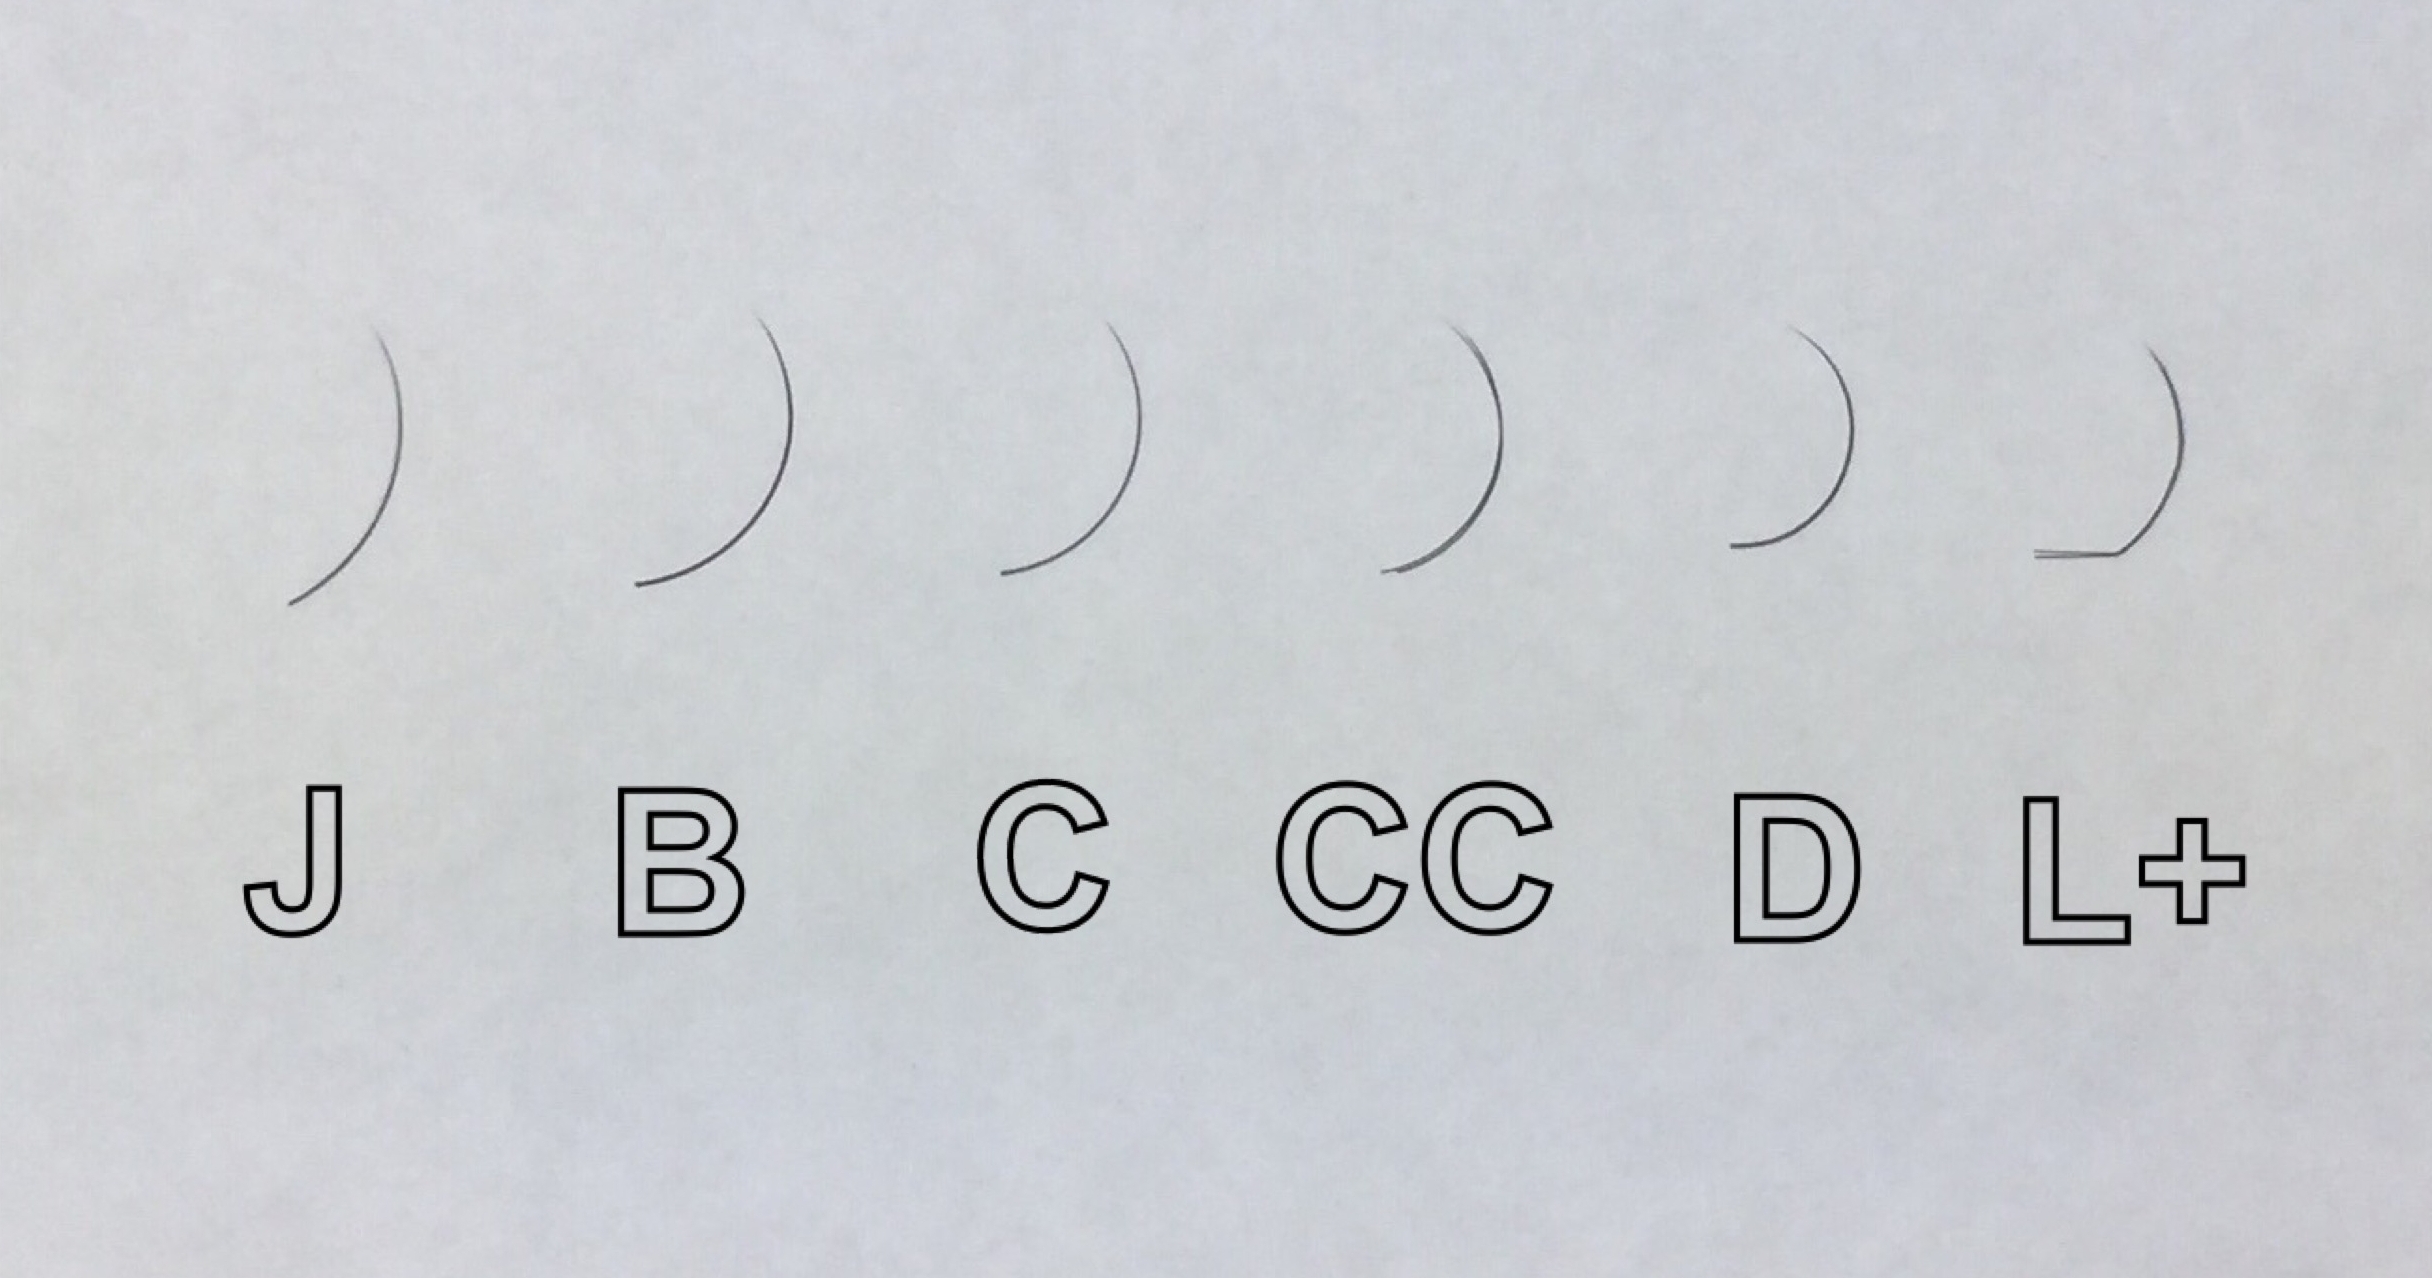
As you progress from left to right, you can see the bend in the fiber that creates a more prominent curl. These are the curls I carry in my salon.
Each of these curls is unique in their own way and each of these curls is needed or used for different reasons.
A J curl and a B curl are very similar except that a B curl is only slightly more curled than a B.
This specific curl would be used on someone with a very hooded eye.
J and B curls will look very natural. I sometimes use these curls on clients who are adamant about having "natural" looking extensions.
Then we move along to C curls, the most popular.
C curls lift the lash more and give the lashes the same look that an eyelash curler would.
C curls can be used on almost any eye, except a hooded eye. If a client has very straight lashes...I mean very straight, try an L+ curl instead of a C curl.
(An L+ curl is also referred to as an LC curl)
A CC curl is a little more curled than a single C curl. These are best for people with at least a slight natural curl.
These lashes will be more visible than a C curl and are increasing in popularity.
A CC curl is not for someone who has ramrod straight lashes, or downward pointing lashes. Upon application there will be too distinct of a difference between the extension and the natural lash.
The natural lash should curl up slightly with the extension so that when you are looking at the lashes from the side you can't see the natural lashes sticking straight forward.
This is where L and L+ curls are really handy.
For starters, I'm hesitant to even call an L curl a "curl." It's more of a lift than a curl. As it sounds, it is the shape of an L.
Clients with Asian eyes are very good candidates for these lashes.
Because their eyes are usually very hooded and their lashes are very straight and point downward, we really want to accomplish a lift.
A J or B curl is a good alternative in terms of how the extension will adhere to the natural lash, but those will not give the client any lift to the lash.
An L+ is my favorite to use. The base of the lash is straight like the natural lash, but it ends in a nice C curl so that the client can get the curl they desire, without the extensions curling back into the upper eye lid.
An L+ is my favorite to use, in general, for any client with downward pointing natural lashes.
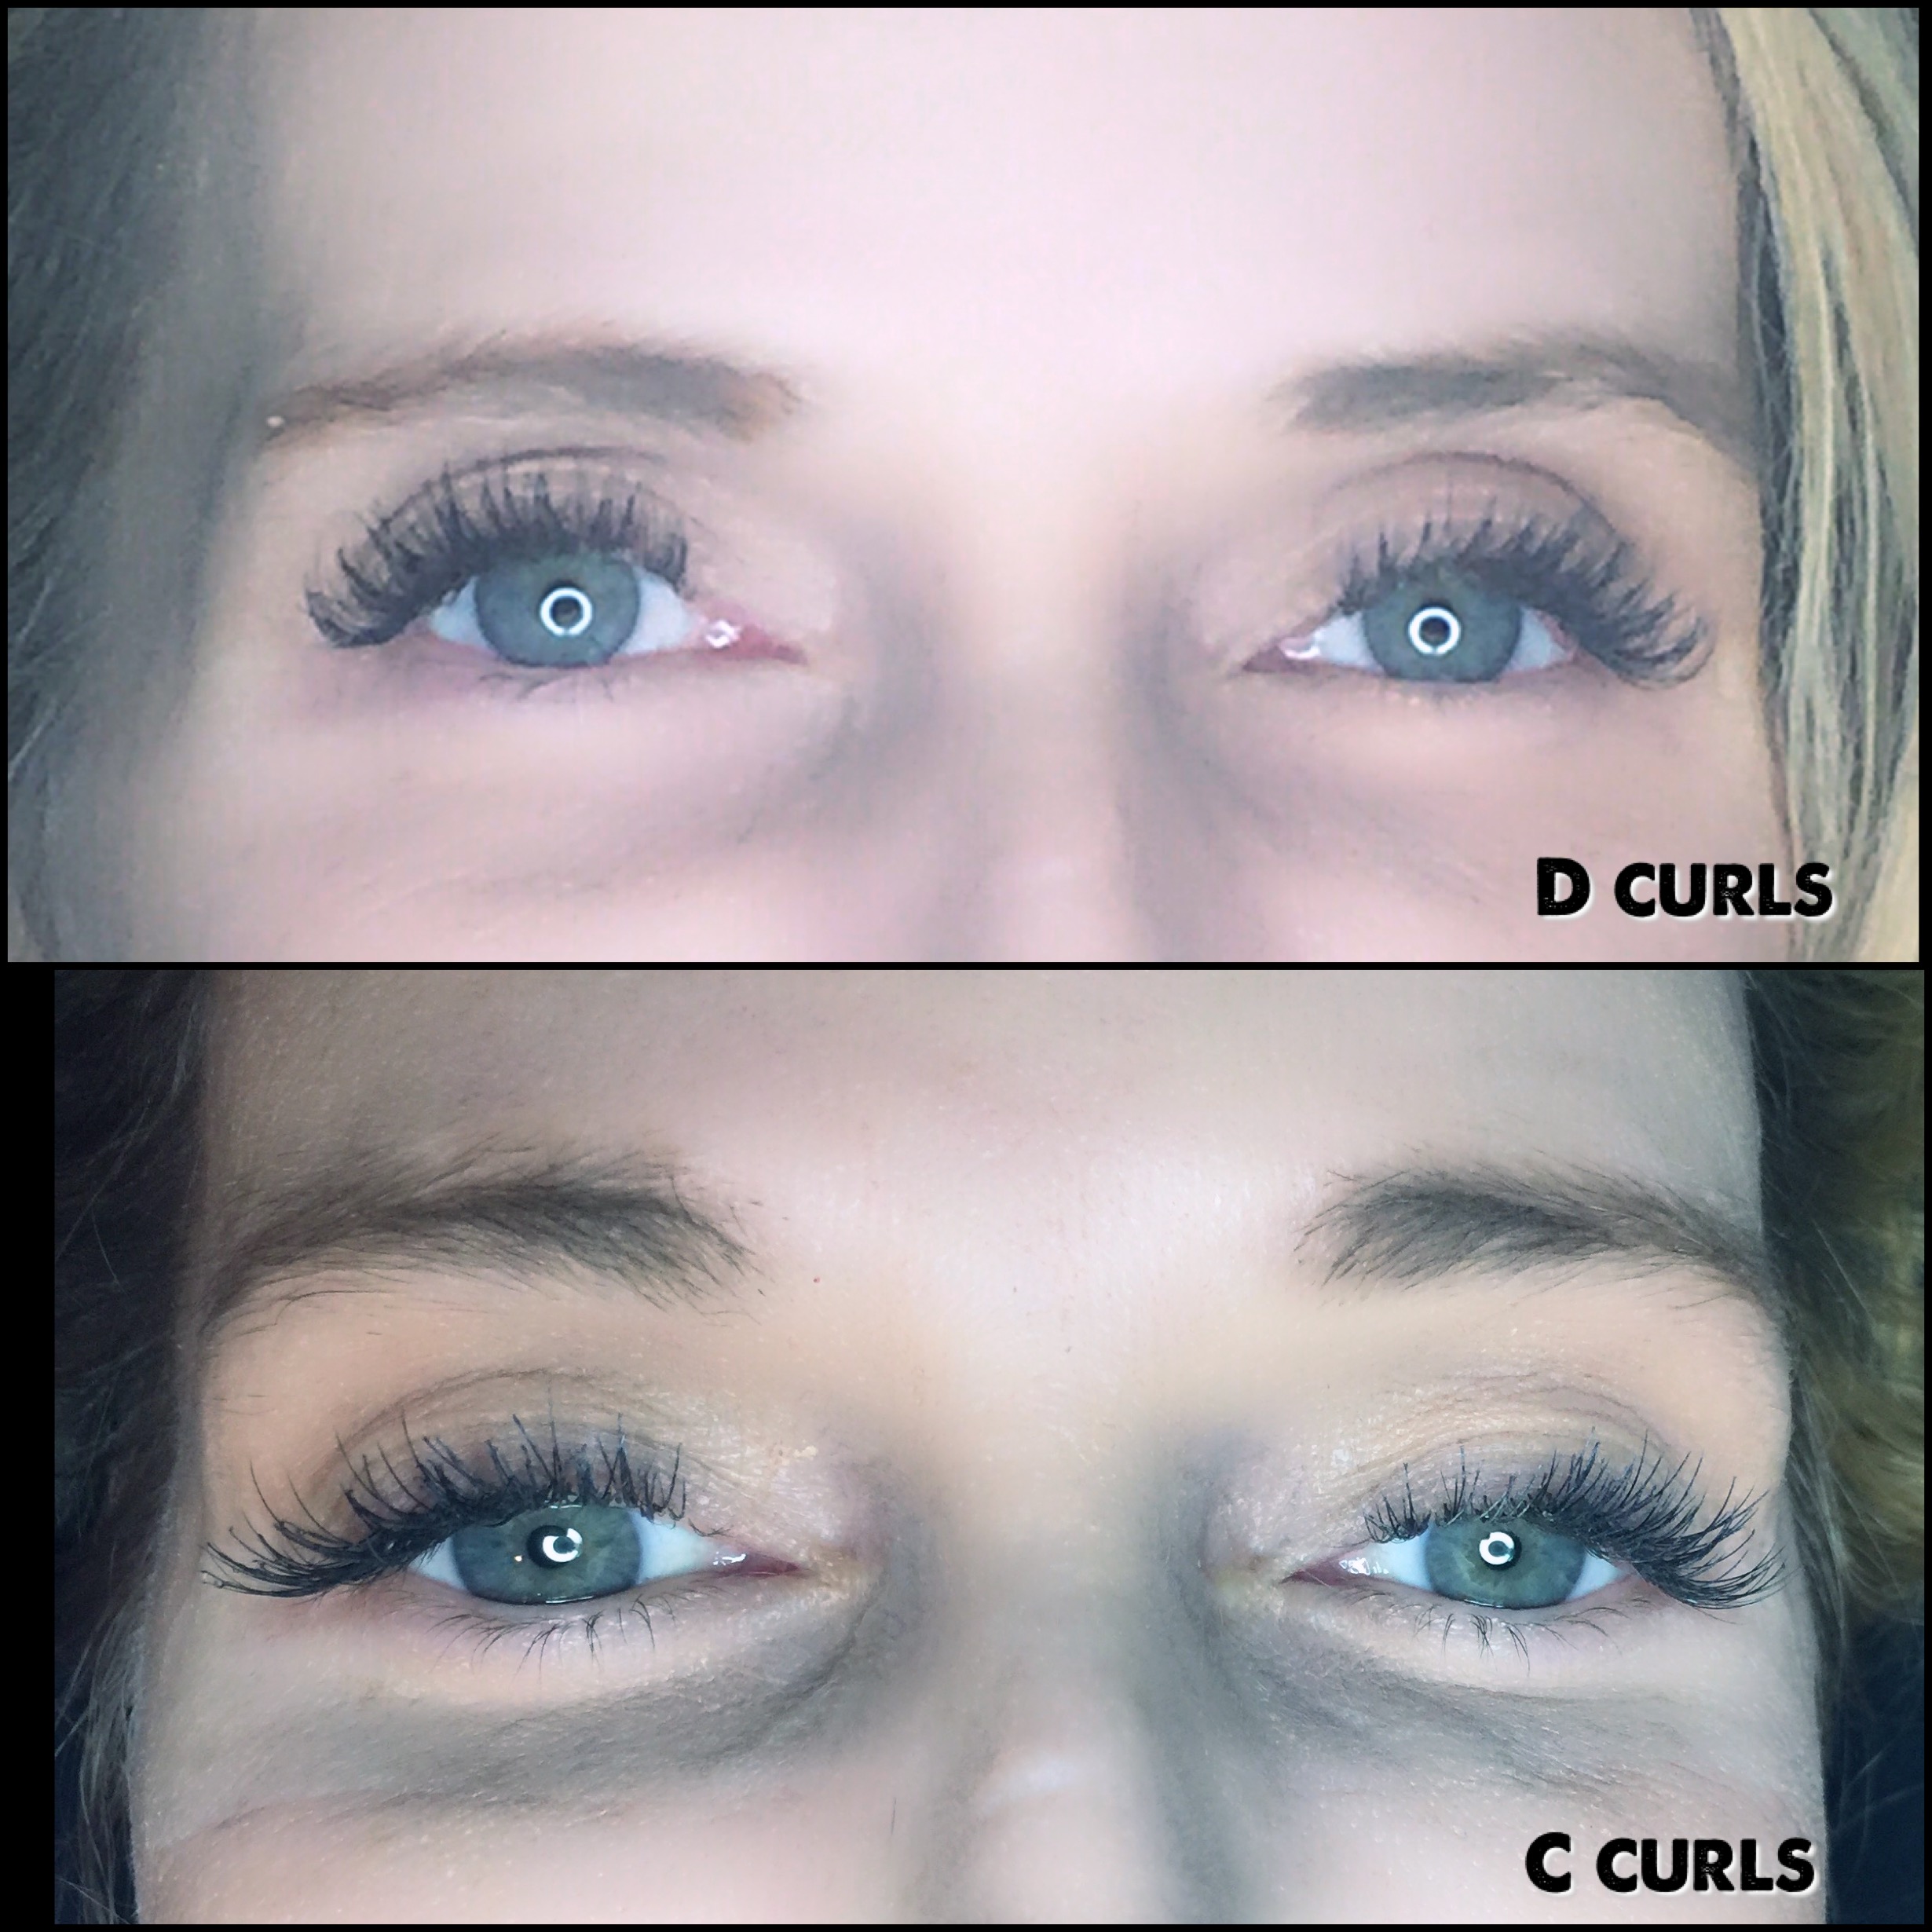
A D curl is the most curly of the lashes, besides the DD curl.
D curls should be used in several specific instances.
If your client has down turned eyes, D curls are great to throw on the end to help lift the eye.
D curls are also great for clients who need their eyes to be opened up.

You can see here that before she had that very sleepy morning look to her eyes. After extension application her eyes are much more opened up, looking alert and vibrant. (These are D curls)
In the picture above you can also see that her natural lashes had some curl on their own. That is why we went with a D curl and not a CC or an L+.
Any of the three would have worked, but I really wanted to open her eyes and D curls are really great for that.
Some of your clients will need only one or two specific types of lashes to achieve the best result, while others you can really play around and have some fun with.
D curls are great to use on clients with prominent eyes. You'll want to use C curls on the inner and outer corners, and a D for the inner 70%.
It's all in what you are trying to accomplish and how your client feels with the end result.
Same client, different curls. She originally started out only wanting a partial set with extensions on the outer lashes. I used J curls then. Then she wanted them all over and more volume so I switched to C curls. This last fill we did I switched to D's to open up her eyes and make the lashes stand up more. You can see how different just the curl shape can affect the look of the eyes.
As a lash artist, you should always be taking before photos to refer to while working on your client, if need be.
As a client, make sure before photos are taken so that you have something to reference.
This is good for you in multiple different ways.
It allows you to keep your expectations realistic. With photos to review back to, you can see just how far your artist has taken you.
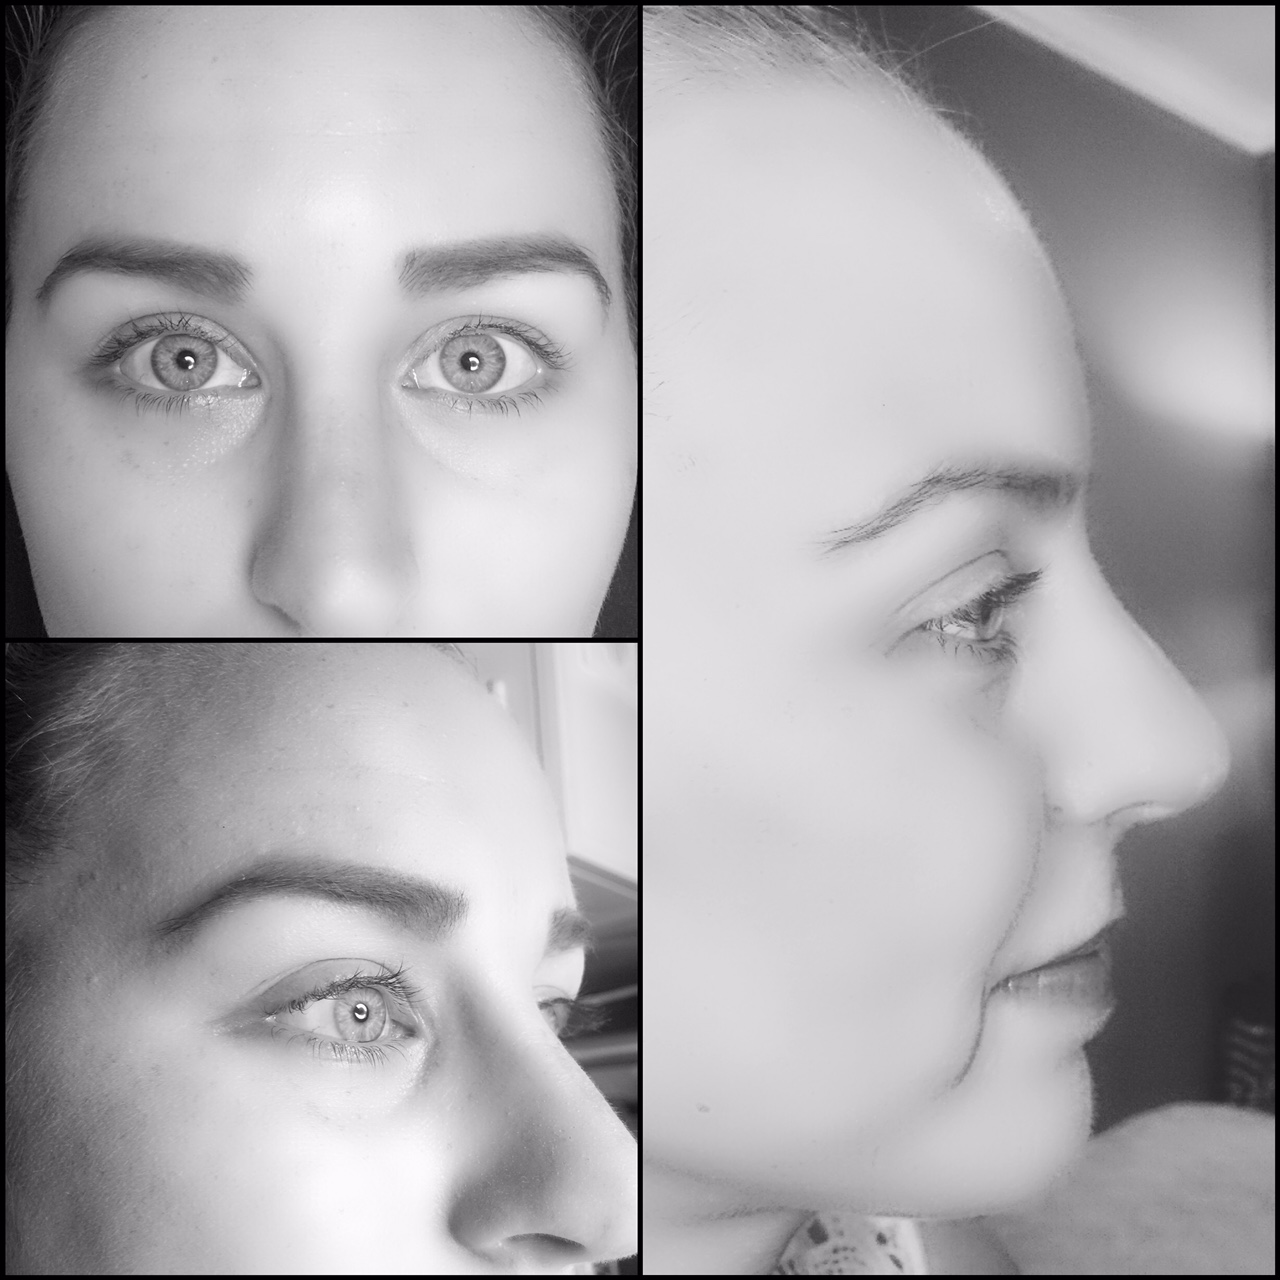
Here are three angles I ALWAYS take for before photos. Additionally, you'll want to get one from your view as a stylist with the clients eyes closed. I always offer to send these to my clients before they leave. I include a before and after photo as well.
This is also a really useful tool if you ever decide you want to switch lash artists. Sometimes it can be tricky to determine what is best for the look of the eye without a clean palette and before photos are awesome for that.
In the event that you have concerns that your artist is no longer practicing proper lashing technique, and you decide to change artists, or even have them removed, before photos are a sure-fire way to ensure there has been no lash damage.
So what do we mean when we talk about "extension diameter?"
This is how thick the eyelash extensions are. The larger the diameter, the more thick the extension and the heavier the weight.
Diameter options have also grown over the years.
For classic eyelash extensions the options are a 0.12 mm, 0.15 mm, 0.18 mm, 0.20 mm, and some people still use 0.25 mm.
I do not carry or use the 0.25 diameter, nor have I ever.
This weight is just too heavy for the natural lash, unless the client has exceptionally thick lashes. I have yet to meet someone who has natural lashes as thick as those.
For volume lashes the options are 0.05, 0.07, and 0.10. There are also companies that are selling 0.03 diameter options.
The 0.03 is used for "Mega Volume" lashes, which is Russian Volume on steroids.
Mega volume is 9-16 0.03 volume lashes created into a fan. This is an advanced technique that requires additional training and certificates.
Just like your natural lash will determine what curl is best, so will the natural lash decide which diameter is best.
Now lets learn a little about the difference between classic lashes and Russian Volume.
CLASSIC VS RUSSIAN VOLUME
Classic lashes have a 1:1 placement ratio, while Russian Volume has up to a 6:1 ratio.
Classic lashes are where one extension is applied to one natural lash.
With Russian Volume, your stylist will create a fan with anywhere from 2-6 extensions and apply that to one natural lash.
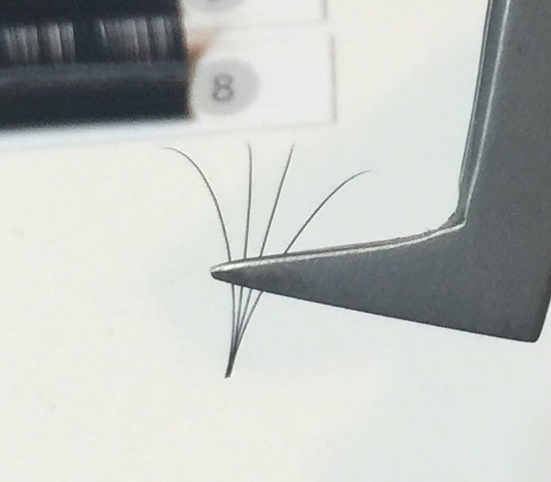
This is what a 4D volume fan looks like.
Volume lashes are significantly lower in weight, which gives the stylist the ability to apply multiple extensions to one natural lash without causing any damage.
The creation of the fan is the reason that Volume full sets take a significantly longer amount of time.
am i a candidate for russian volume or classic lashes?
Both Classic and Volume lashes are going to give you an enhancement to the look of your eye, not to mention save you time in the morning. You can kiss your awful relationship with mascara goodbye!
Classic lash extensions are going to look more like mascara.
You should get classic lashes if:
- You prefer a more natural look
- You have a plethora of natural lashes
- You naturally have long, thick lashes
- You want a more voluminous look, but you naturally have abundant and dense lashes
You should get volume lashes if:
- You have very minimal natural lashes
- You have very frail natural lashes
- You have very short natural lashes
- You enjoy the way strip lashes look
- You have dense and abundant natural lashes, but you want super thick fluffy lashes
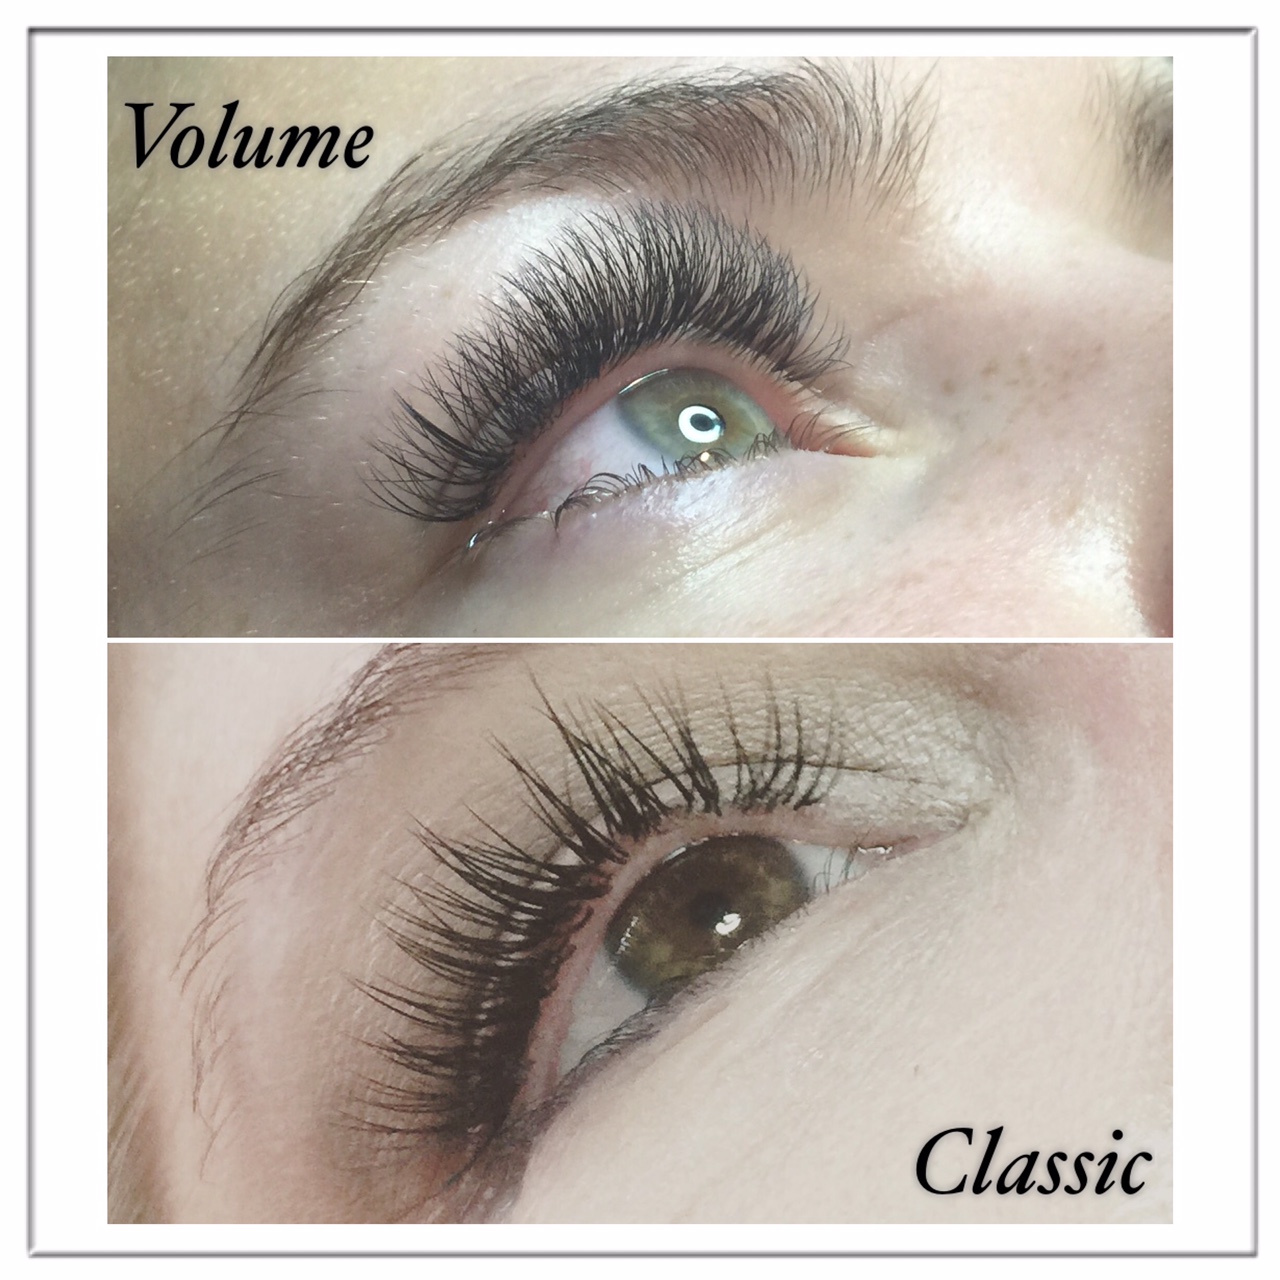
Different eyes with the same curl, length and diameter will look completely different. This volume picture has C curls and this classic picture has J curls. These clients have very different eyes and require different styles. I want you to notice how the volume lashes look much more fluffy and the classic lashes look more like amazingly applied mascara.
(Click here to read more on Classic lashes vs Volume lashes.)
We've covered a lot of information about lash extensions...
but what about before the service?
How do i prepare for my eyelash extension service?
There are only a few "rules" that need to be followed prior to your extension application.
1. As I mentioned earlier, you should arrive eye makeup free.
Your stylist should clean your lashes before she begins your service, but she should not be spending 10-15 minutes removing your mascara. That's a waste of her skill time and your money.
2. If you wear contacts, you must bring your case with solution.
Contacts cannot be worn during a lash service.
A simple precaution, but necessary, should any adhesive mistakenly get in the eye.
I usually recommend my clients bring their glasses, or arrive wearing their glasses on service days.
3. If you get your lashes tinted, this must be done a minimum of 24-48 hours prior to extension application.
Even with a plant based dye, the residual compounds can interfere with adhesive bonding.
The last thing we want is for you to spend all this time and money only to have your extension adhesive break down and all your new lashes fall off.
4. Schedule any facial service that includes steam or cleansing before your lash appointment.
Steam (water) in excess will shock the adhesive and disable proper bonding.
5. If you wear water-proof mascara, discontinue use 3 days prior.
(For further reading on how to prepare for lashes, click here.)
EYELASH CONTRAINDICATIONS
There are a few instances in which you should not get eyelash extensions.
If you have an eye infection, such as pink eye (conjunctivitis.)
Not only is pink eye insanely contagious, but we run the risk of spreading the infection from one eye to the next. You must be completely infection free to get extensions.
If you have an overgrowth of demodex (eye mites).
Demodex are tiny bugs that are considered a parasite. They live naturally in the pores and follicles of mammals. Improper care and cleaning of the lashes can cause these to make their home on your lashes.
While it may not be recommended, it is safe to lash if you have any of the following:
- Allergic conjunctivitis - exposure to allergens cause the eyes to become red and watery.
- Corneal abrasion - a minor scratch to the eyes cornea, caused by dust, contacts, or any other variety of foreign object.
- Blepharitis - inflammation of the eyelash follicles.
- Dry eye - when the eyes produce insufficient tears.
- Glaucoma - a disease in which pressure on the optic nerve leads to vision loss.
- Stye - an inflamed, painful red area, usually presented as a bump on the eyelid.
- Scleritis - severe inflammation of the sclera.
If you experience any of the above bullets, it is mandatory you discuss this with your lash artist prior to your appointment.
Although it is generally safe to lash during any of those specific issues, she may not be comfortable depending on issue.
If I left anything out that you are curious about at all, please comment below!
Happy Lashing!